
What you need to build a landing page with Claude
Three things, all free:
Why systeme.io?
Because Claude can generate the page, but it can't host it, give it a custom domain, or capture leads into a CRM. Systeme.io does all of that: hosting, forms, email automation, contact management. All on a free plan. It's the infrastructure that turns a pretty HTML file into a real lead generation machine.
-
Generate the landing page with Claude
Open claude.ai and paste this prompt. Swap out the bracketed sections with your own details:
Build me a modern landing page for my [NICHE] business.

Brand name: [YOUR BRAND NAME]

Goal: [WHAT YOU WANT VISITORS TO DO, e.g. download a free eBook, join a waitlist, sign up for a newsletter, book a free consultation]

Design direction: [PICK ONE: dark and bold / light and clean / warm and inviting / colorful and energetic]

Colors: [YOUR BRAND COLORS, e.g. #1A1A2E and #E94560 / or leave blank and let the AI choose a distinctive palette]

The page should capture leads with an opt-in form. Make it visually impressive with strong typography contrast, layered sections with depth (shadows, gradients, overlays), and real visual hierarchy so the eye moves naturally from headline to form. Use lots of images. Make it mobile responsive.

Include scroll-reveal animations on sections and cards.

Don't use a generic template look. Every section should feel like a deliberate design decision, not a default.

Important: Wrap all content inside a single container div with a unique ID, and scope all CSS styles to that container so they don't affect anything outside of it. Any JavaScript should only run when the page URL does not contain "/dashboard".
Claude will generate a complete HTML page: full layout, copy, images, form fields, styling, everything.
Here's the exact prompt used to generate the prompt library page above:
Build me a modern landing page for my AI prompts business.

Brand name: systeme.io

Goal: download a free library of 30 AI prompts for building, launching, and selling online (landing pages, email sequences, course outlines, sales copy, ad copy, and social content)

Design direction: dark and bold

Colors: #00A0FF and #19191B

The page should capture leads with an opt-in form. Make it visually impressive with strong typography contrast, layered sections with depth (shadows, gradients, overlays), and real visual hierarchy so the eye moves naturally from headline to form. Use lots of images. Make it mobile responsive.

Include scroll-reveal animations on sections and cards.

Don't use a generic template look. Every section should feel like a deliberate design decision, not a default.

Important: Wrap all content inside a single container div with a unique ID, and scope all CSS styles to that container so they don't affect anything outside of it. Any JavaScript should only run when the page URL does not contain "/dashboard".
Tip: Claude outputs a full HTML document with
<!DOCTYPE>,<head>, and<body>tags. That's expected. The next step handles the conversion. -
Convert the code with the Raw HTML Converter
Systeme.io's page editor accepts code that goes inside the
<body>tag only. Claude generates a full HTML document with headers, font imports, and wrapper tags that would break if pasted directly.The Raw HTML Converter fixes this in one click.
Paste Claude's full HTML output into the left panel ("Paste your HTML")
Click Convert for systeme.io at the bottom
The converted code appears on the right panel ("systeme.io-ready output"). Click the Copy button in the top right corner of that panel.
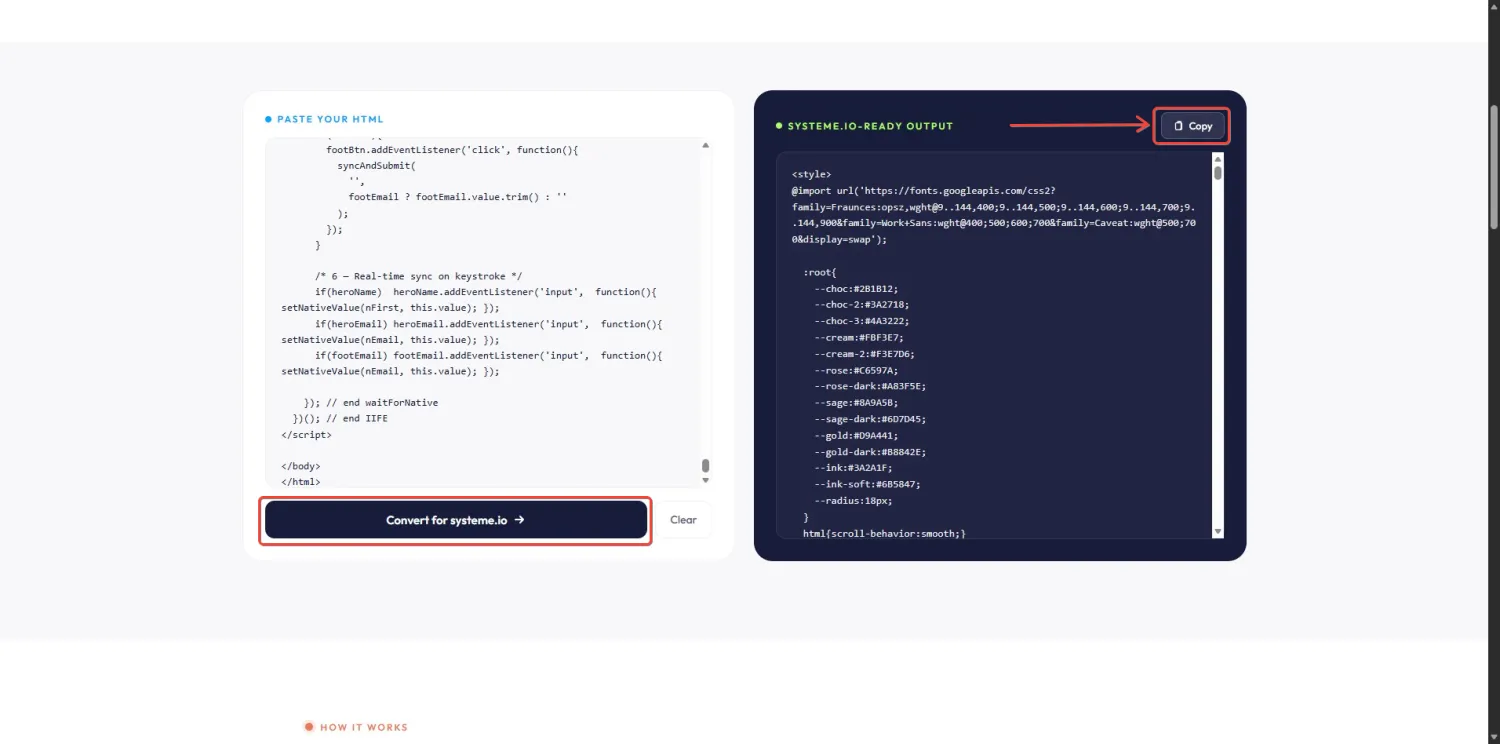
The converter moves styles into the body, strips the document wrapper, caps
z-indexvalues so they don't conflict with systeme.io's editor, and keeps your fonts alive. Takes about 3 seconds. -
Set up the funnel in systeme.io
Now you need a place to put the page.
Log into systeme.io and go to Sales funnels
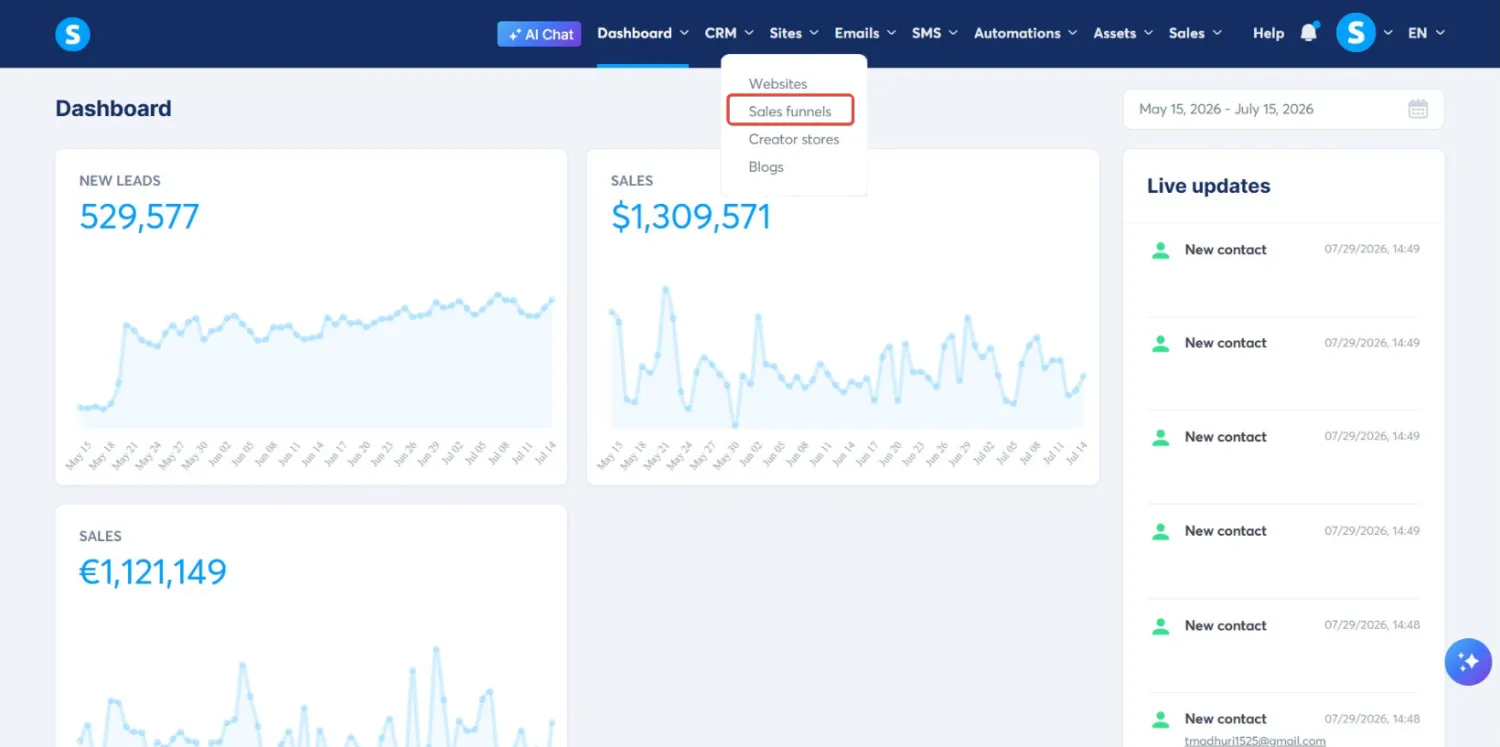
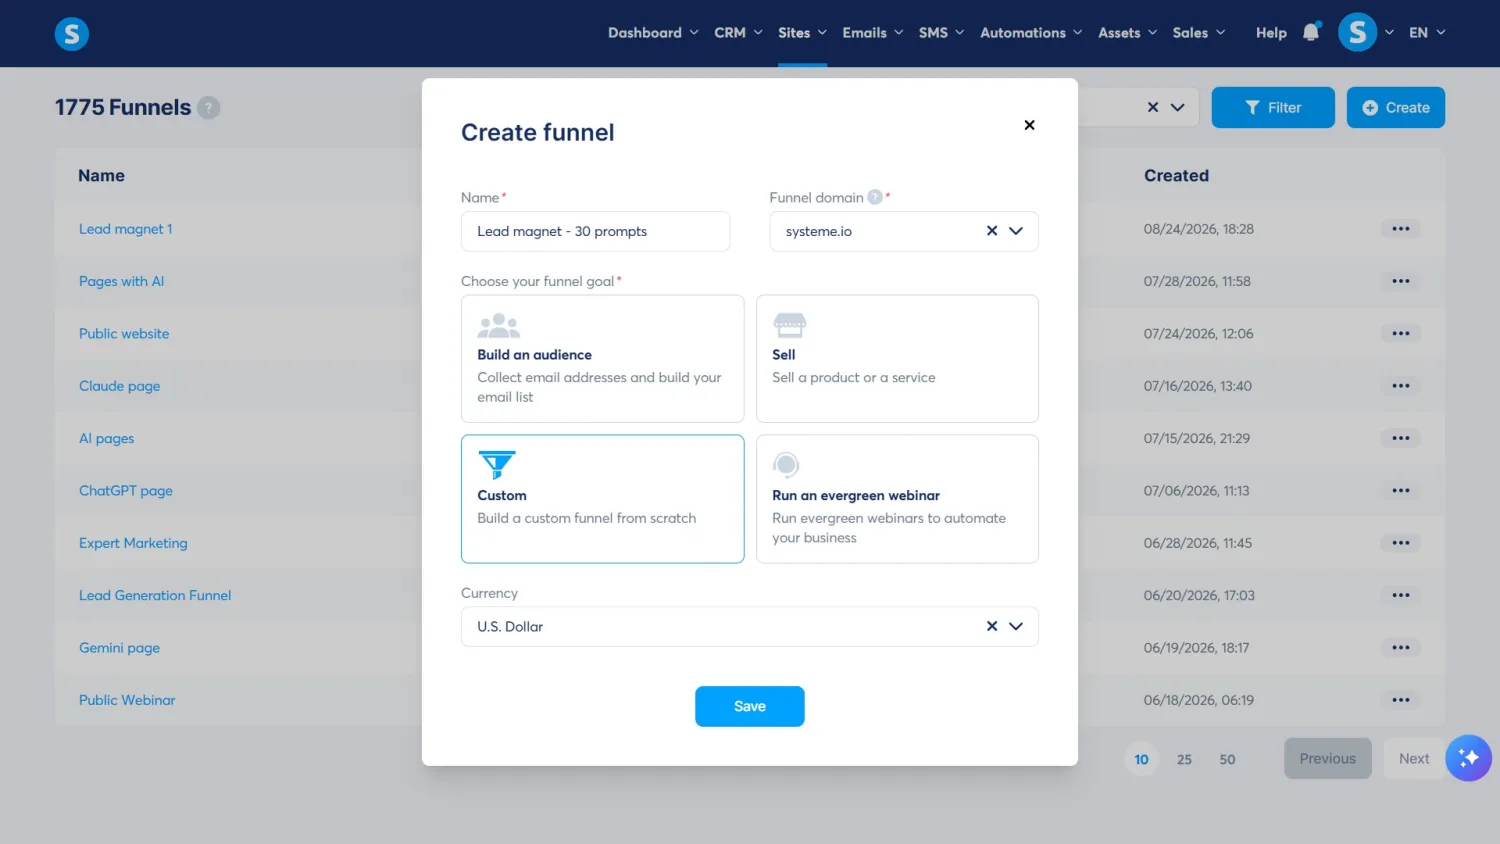
Click Create (top right)
Give your funnel a name (e.g. "Lead magnet - 30 prompts")
Choose a funnel domain from the dropdown
Under "Choose your funnel goal", select Custom
Click Save
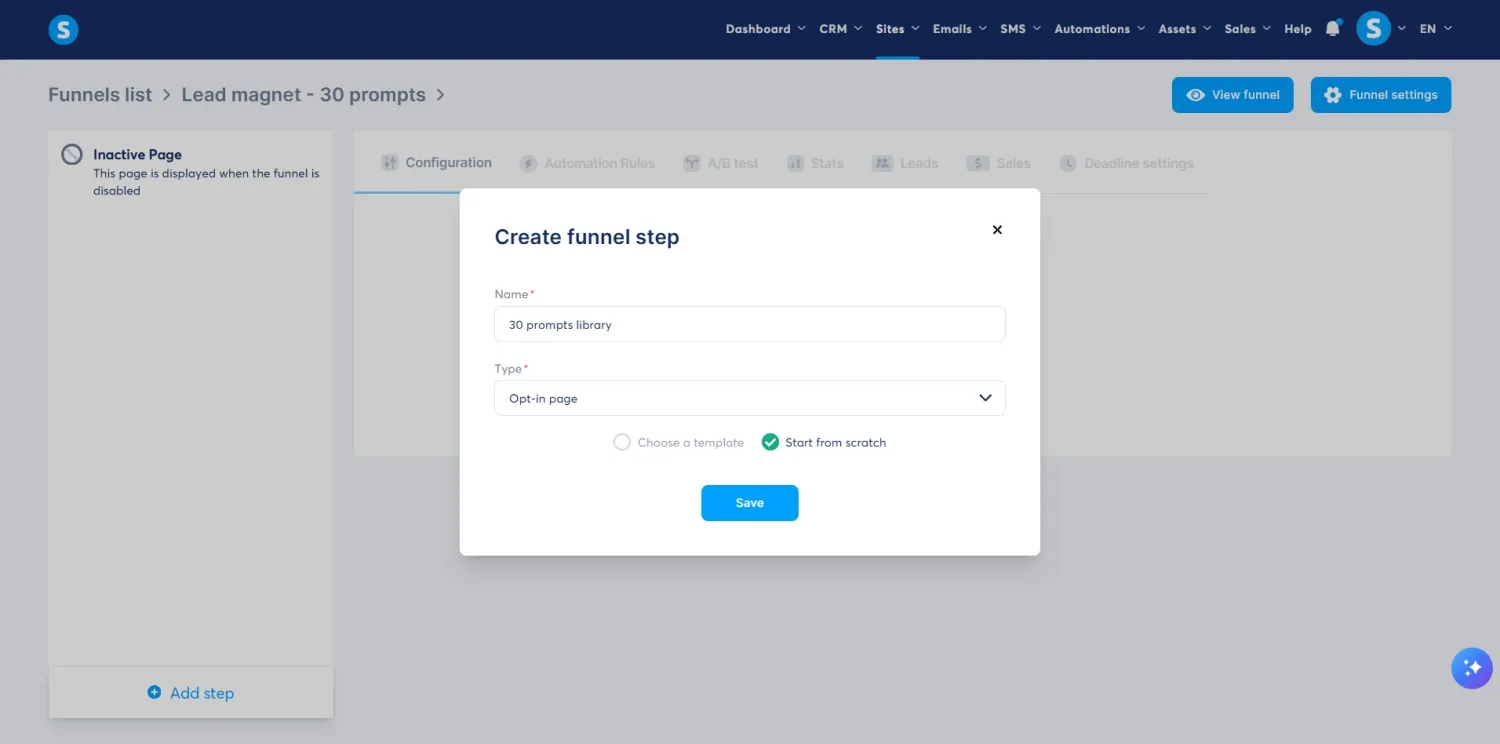
You're now inside your funnel. Click Add step in the left sidebar
Name your step (e.g. "30 prompts library")
Set the type to Opt-in page
Select Start from scratch and click Save
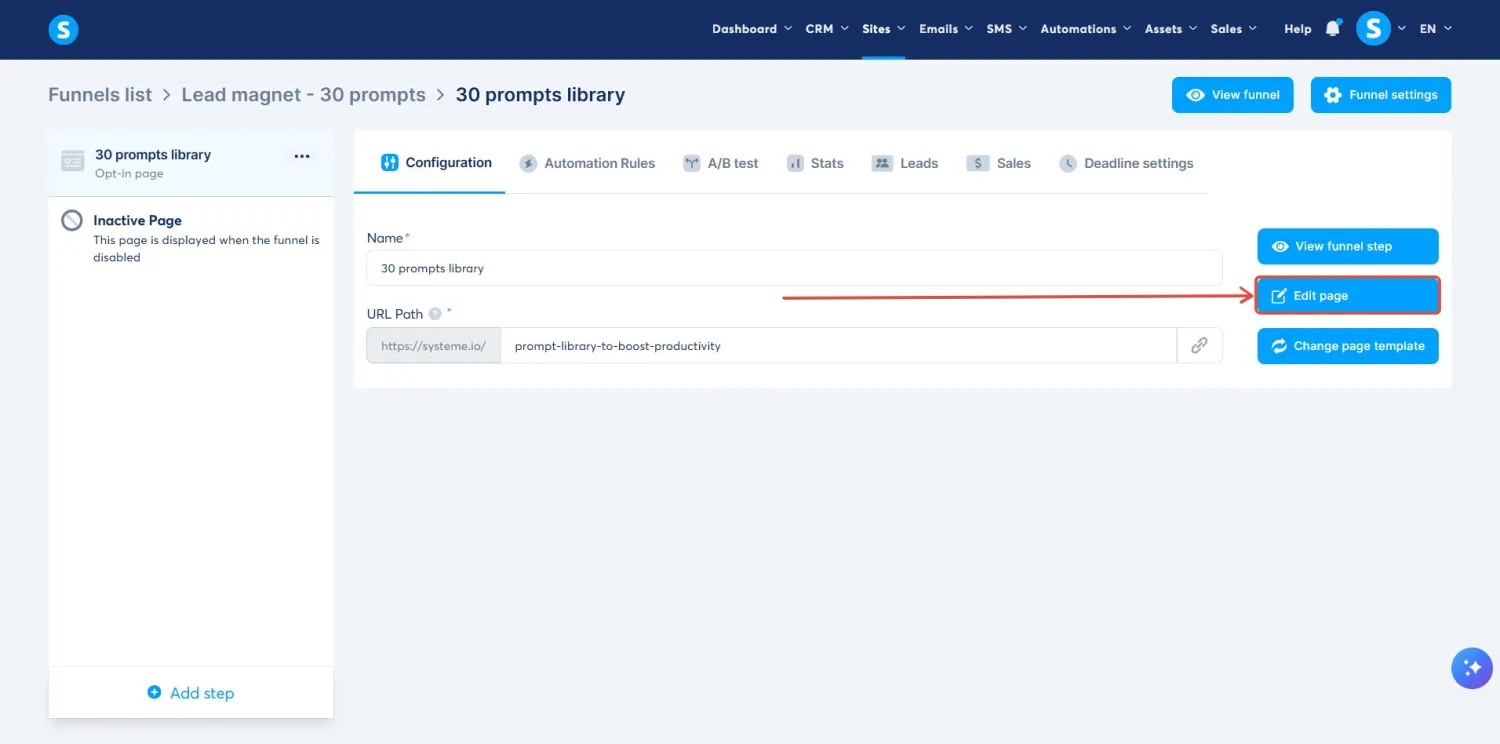
Click Edit page to open the editor
-
Add the Claude HTML page to systeme.io
Now paste the converted code into the editor and clean up the layout.
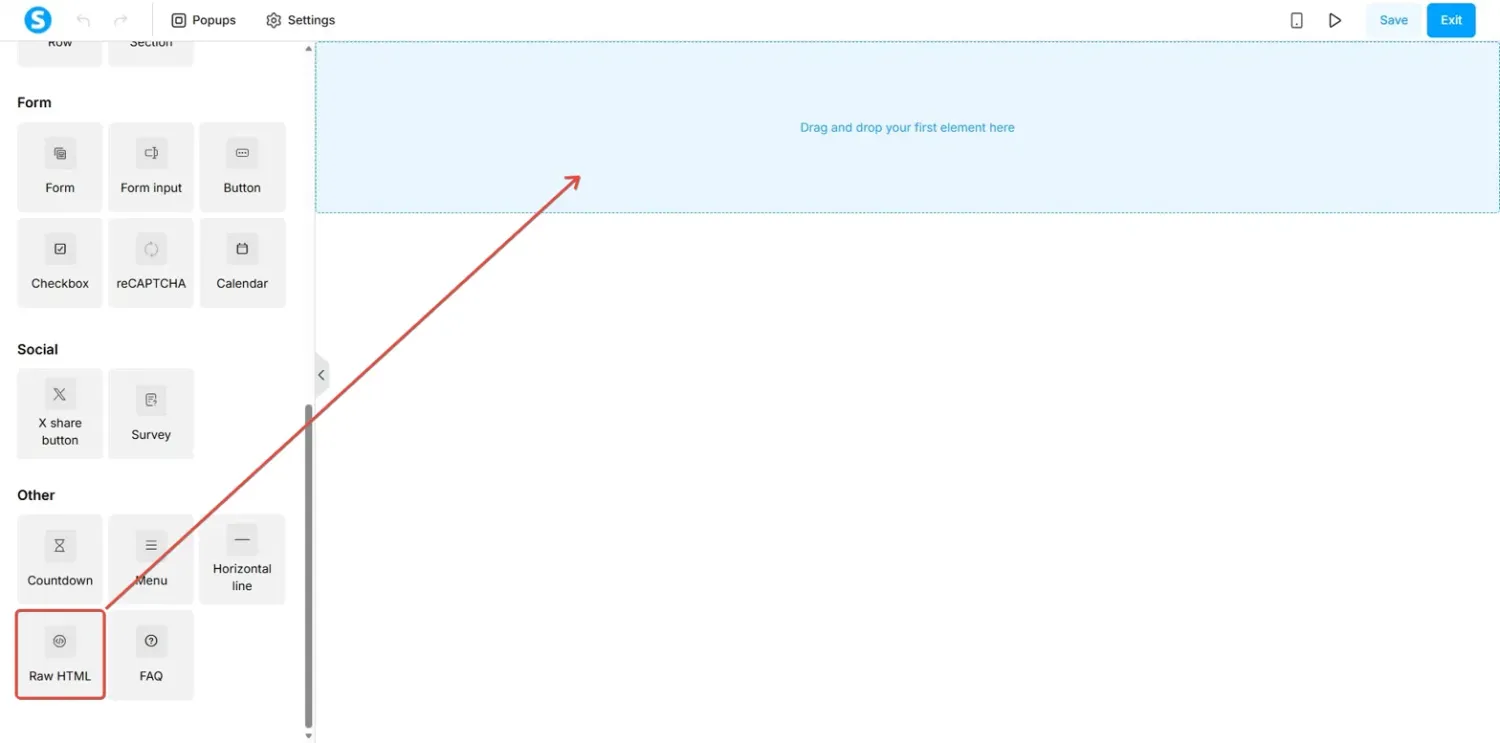
In the left sidebar, scroll down to the Other section
Drag the Raw HTML element onto the canvas
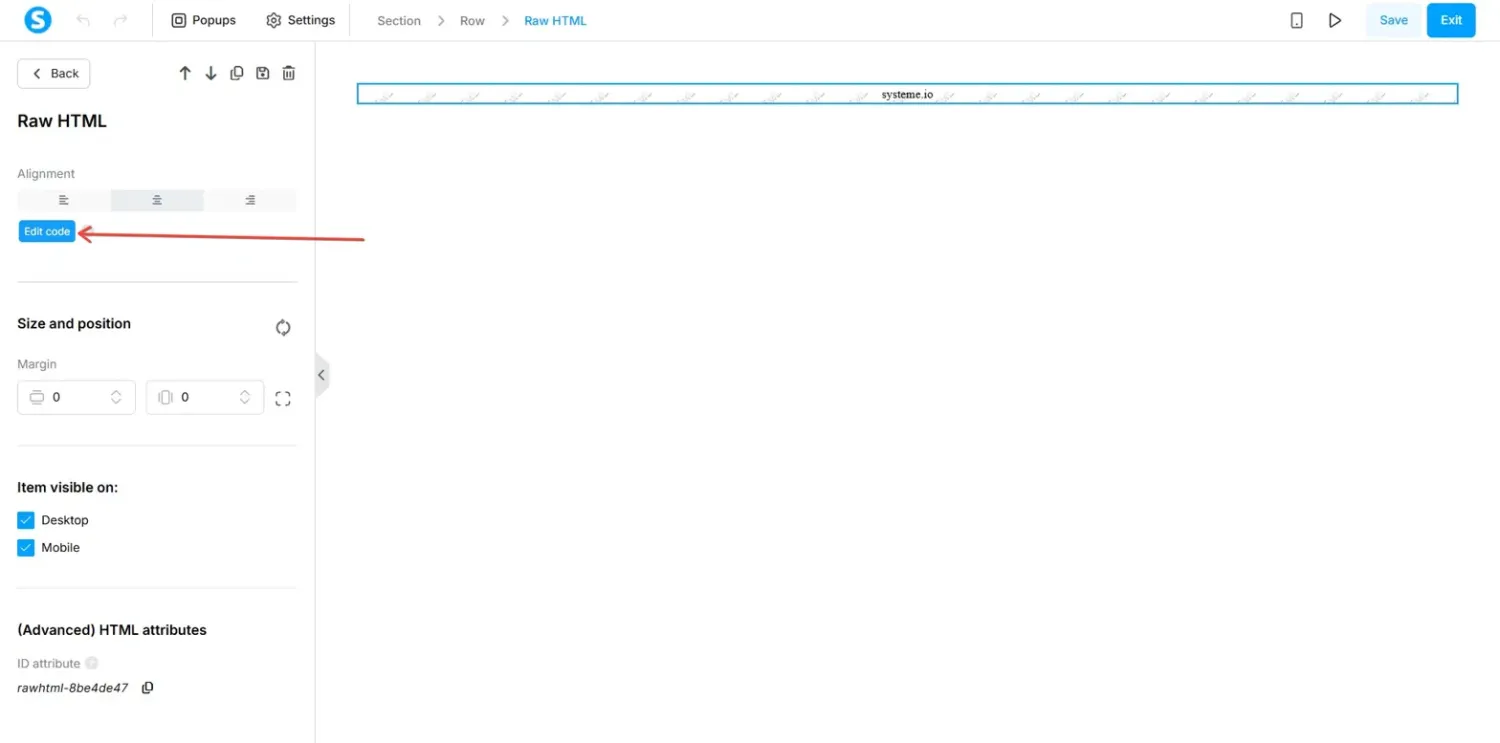
Click on the Raw HTML element to select it
In the left panel, click the Edit code button
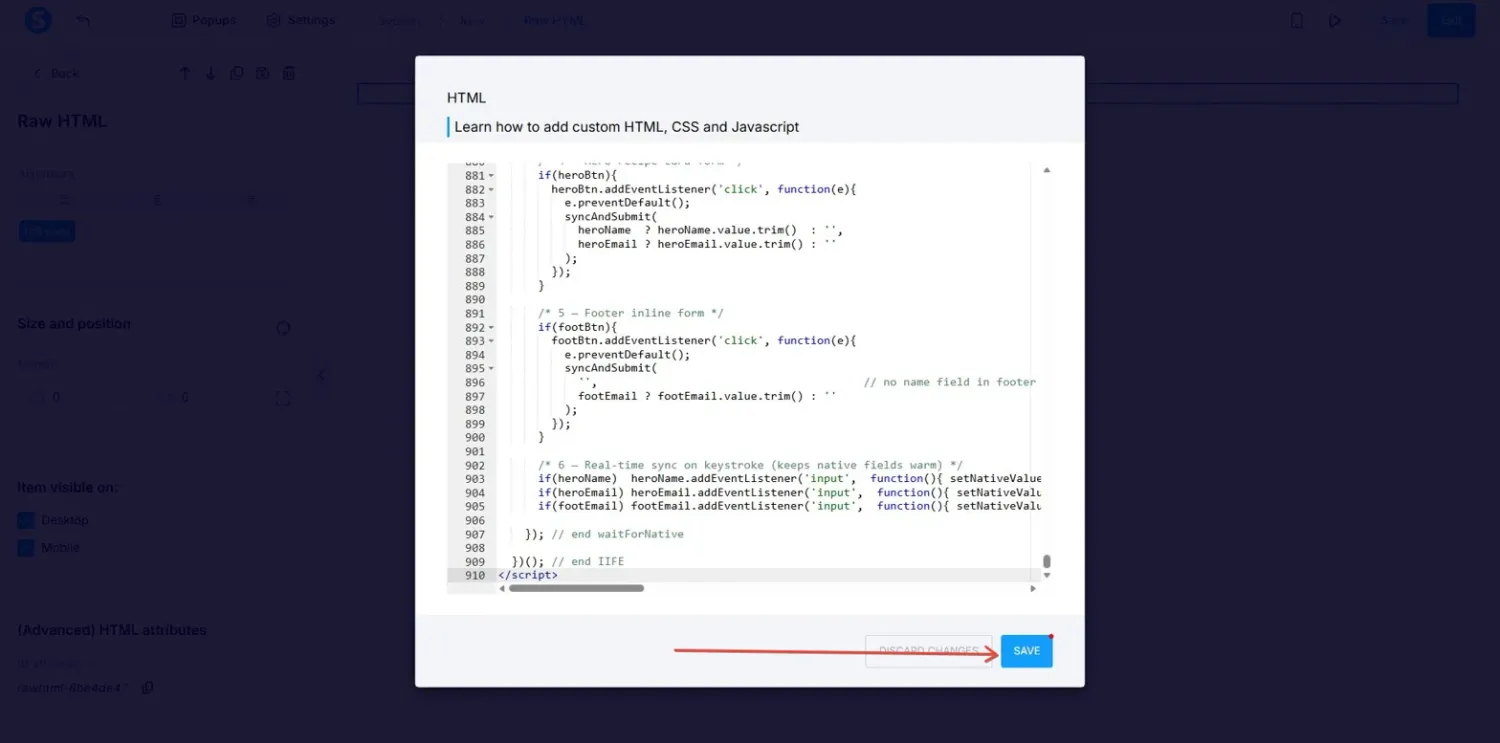
A code editor will open. Paste the converted code from Step 2 into the text area
Click Save
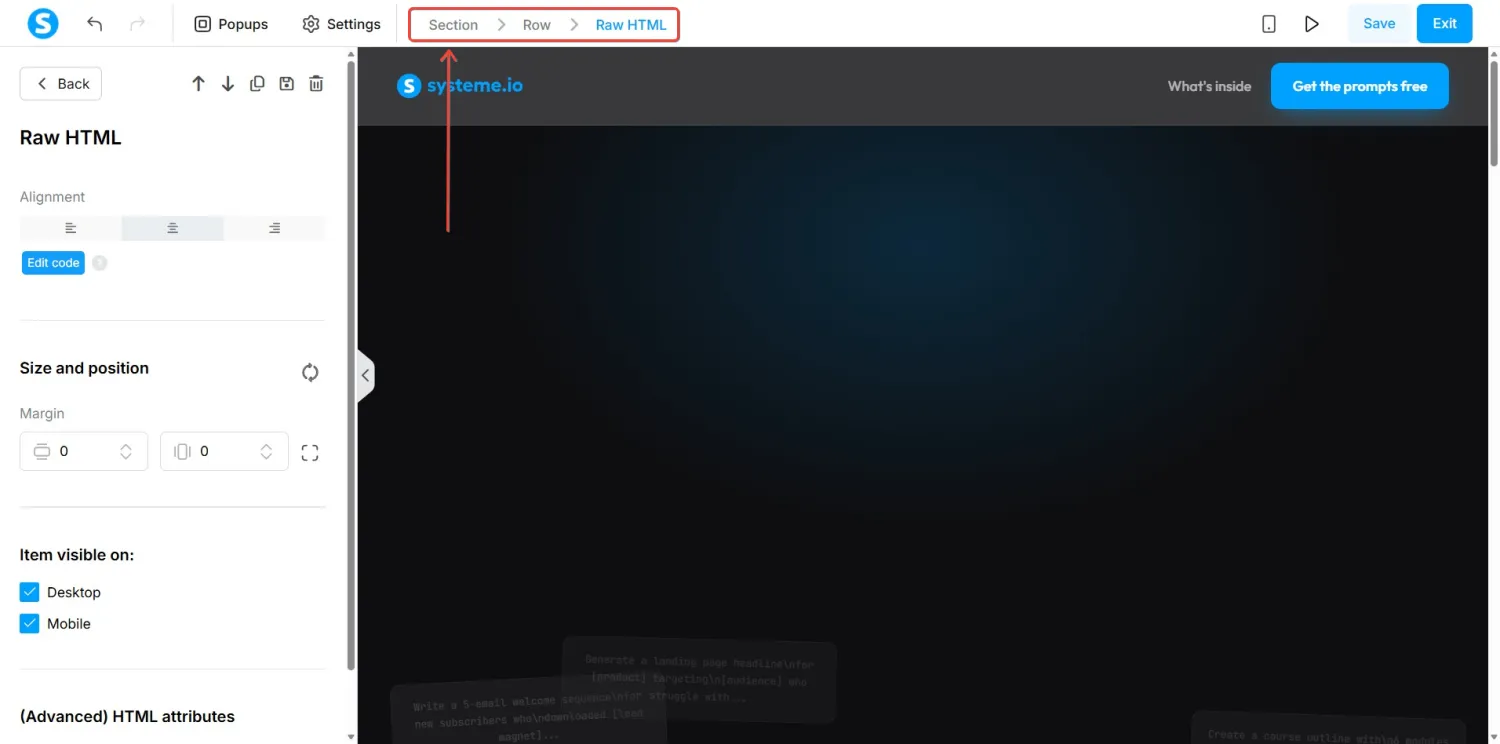
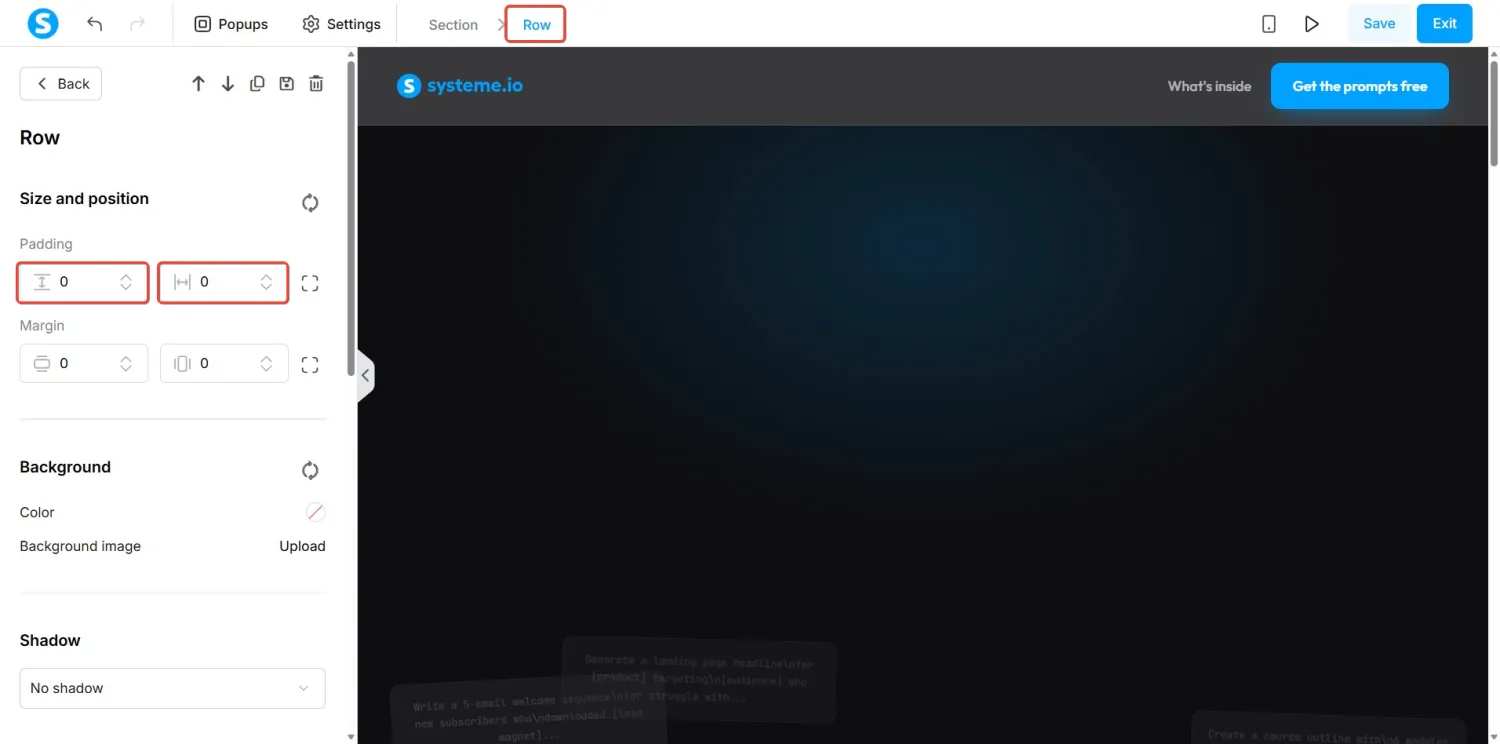
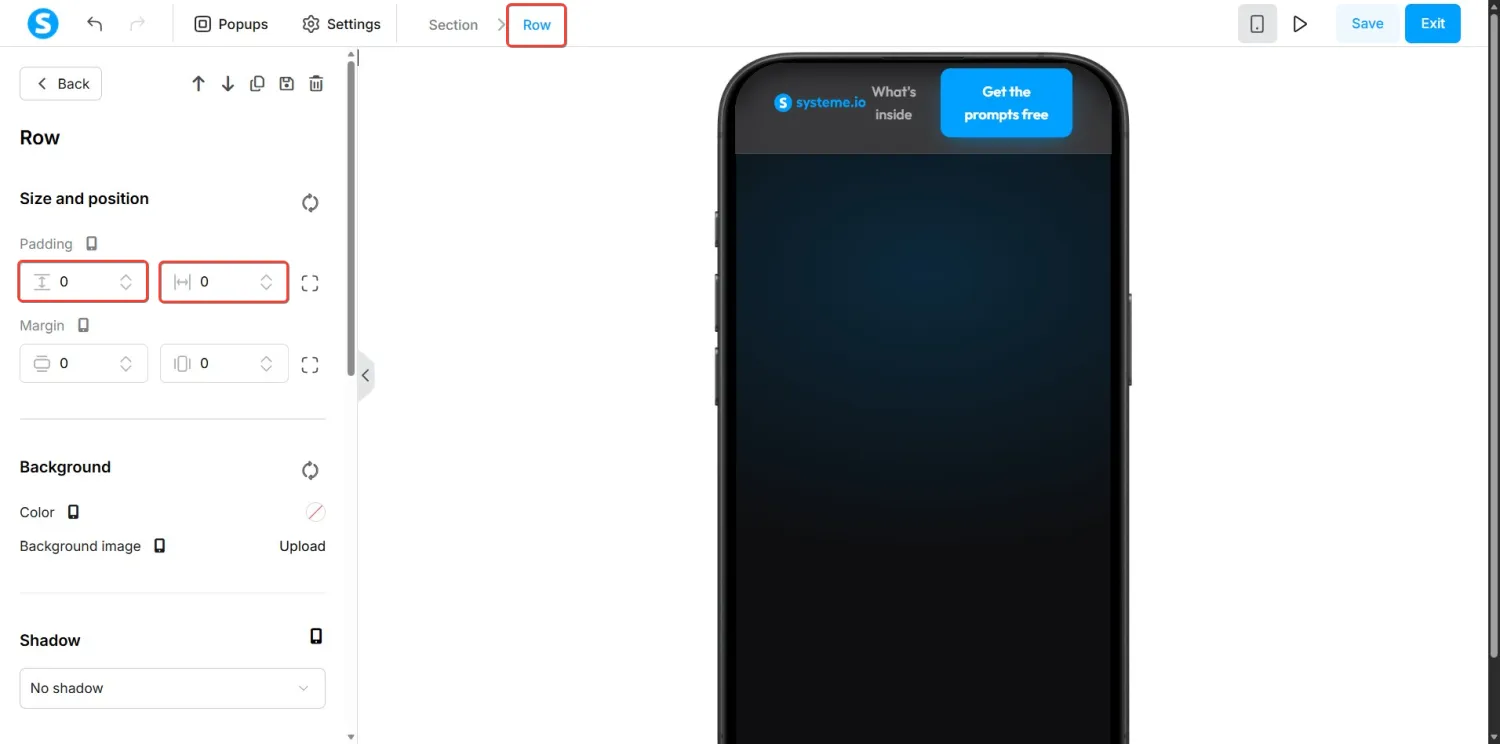
Now remove the default padding so your page goes edge-to-edge. Click Row in the top breadcrumb (Section > Row > Raw HTML) and set both Padding values to 0
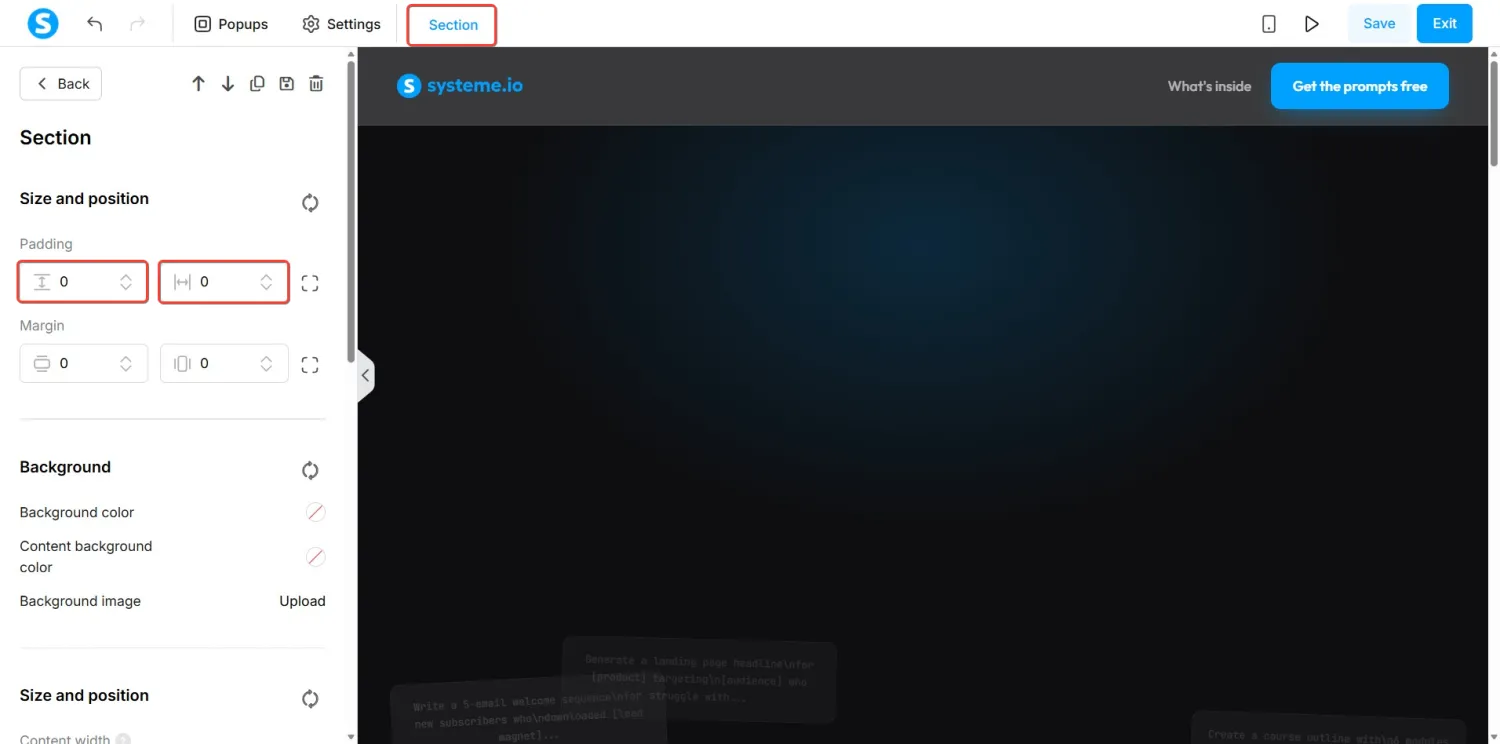
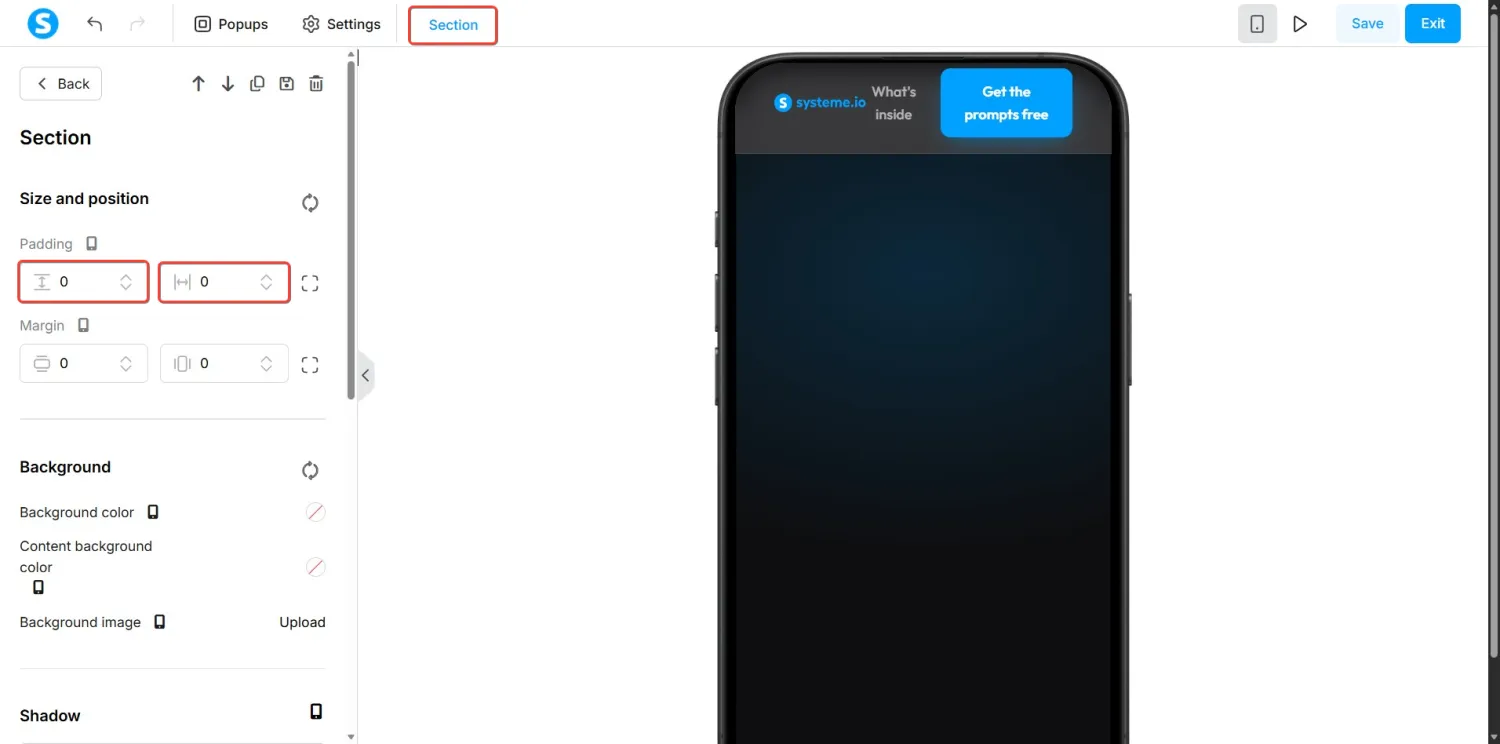
Then click Section in the breadcrumb and set both Padding values to 0 as well
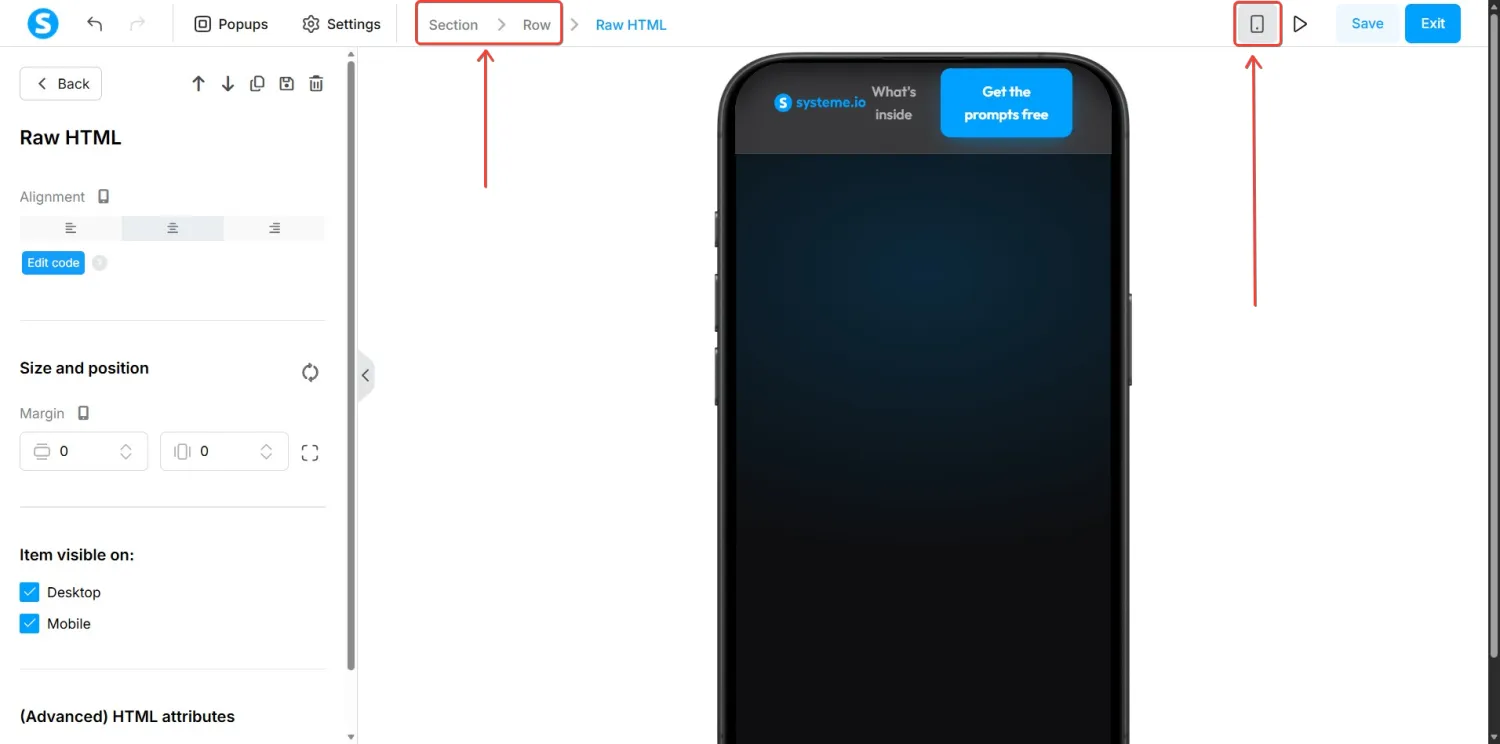
Do the same for the mobile version
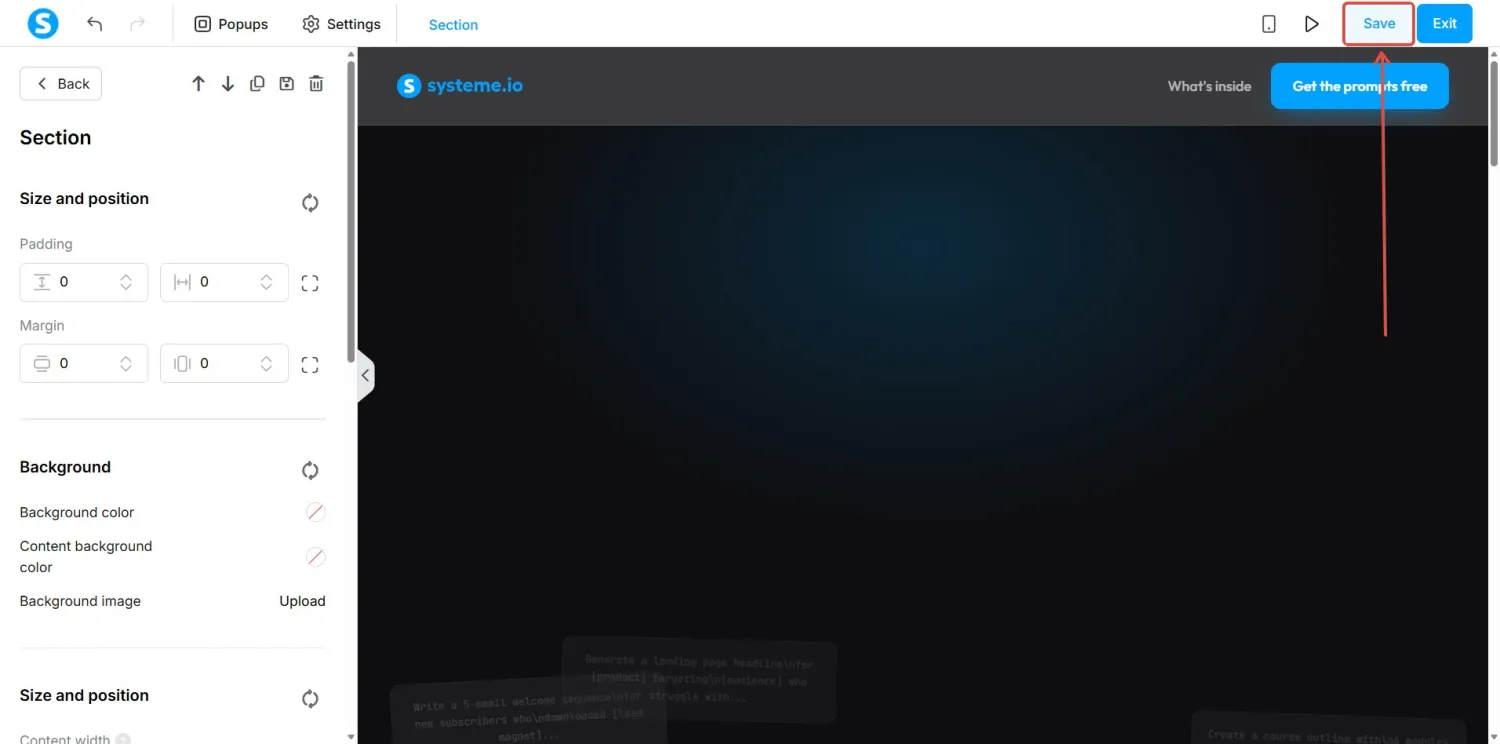
Save your page
-
Add a native systeme.io form
This is the step that makes your page actually capture leads. You'll add systeme.io's native form and configure what happens when someone submits.
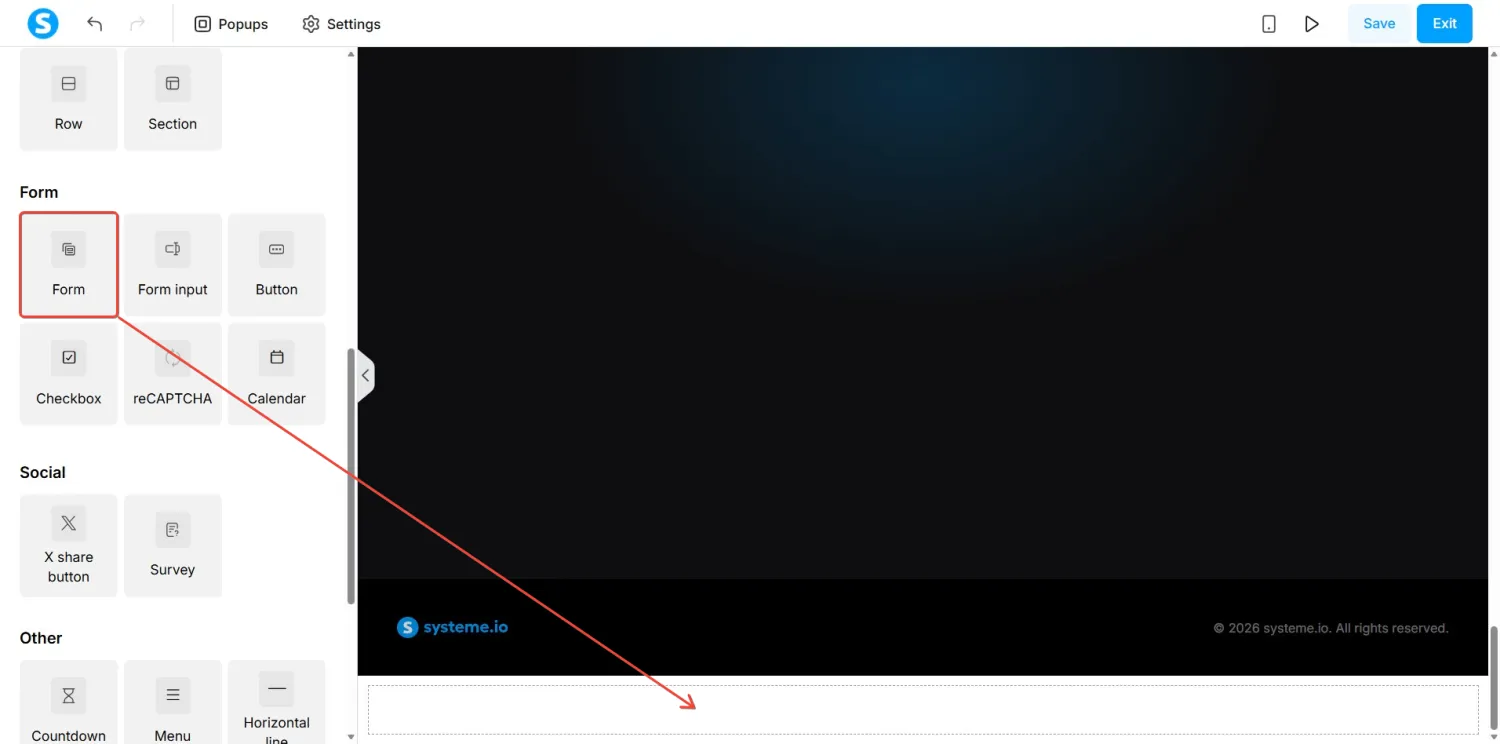
In the editor, go back to the left sidebar. Under Column layout, drag a Row element onto the page below the Raw HTML block
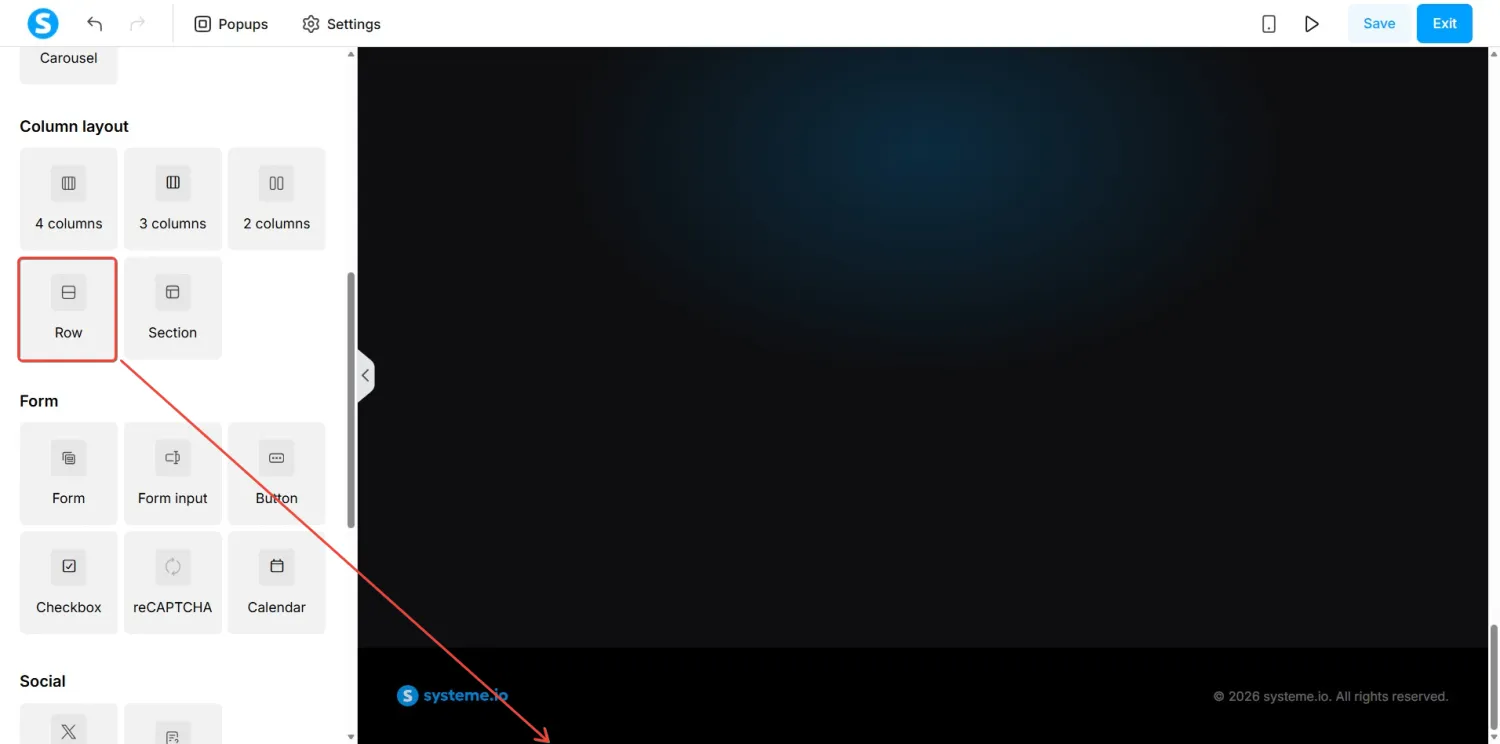
Now drag a Form element (from the Form section) into that new row
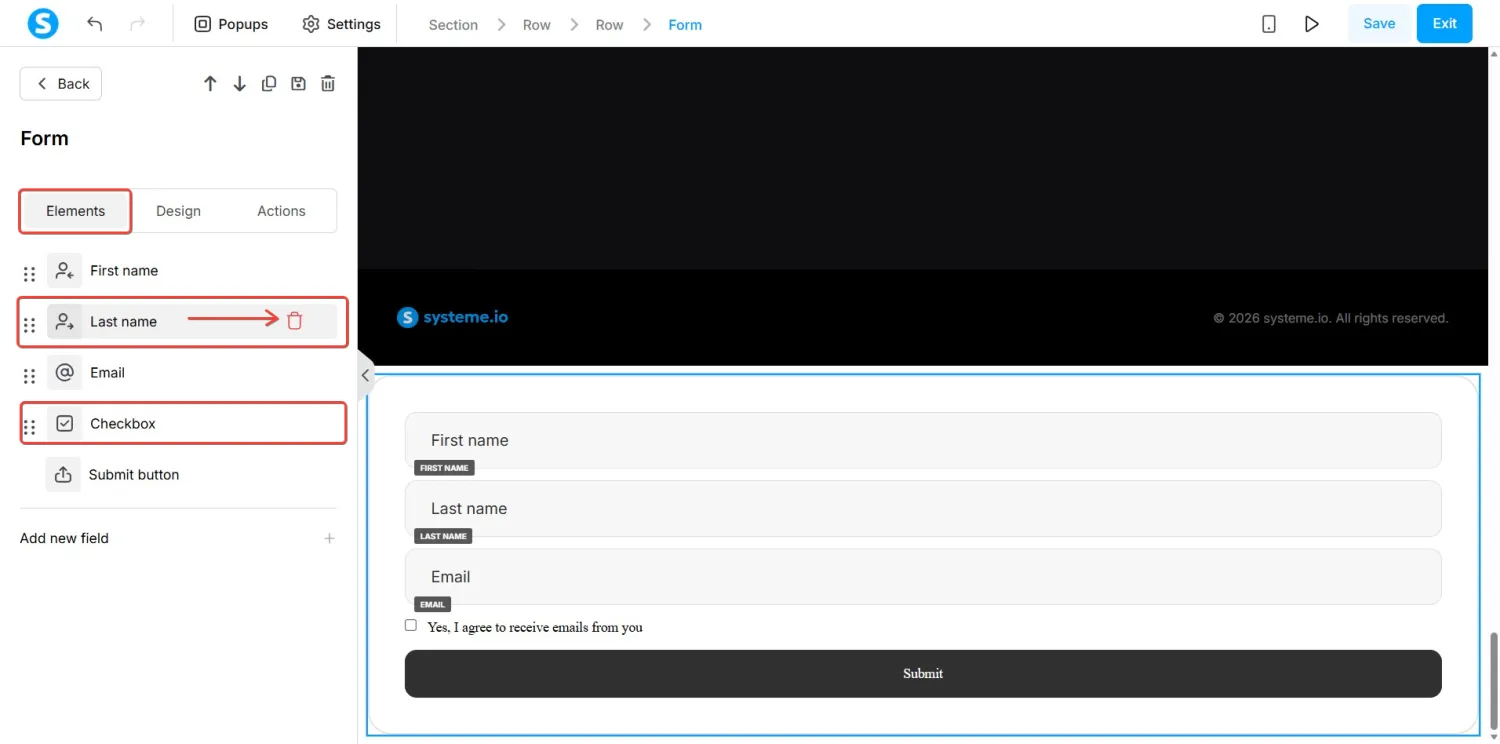
The native form comes with default fields. Remove any fields that don't match your custom HTML form by clicking the trash icon next to them.
For example, if your custom form only asks for a first name and email, delete the "Last name" field and the checkbox. You should be left with just "First name", "Email", and "Submit button".
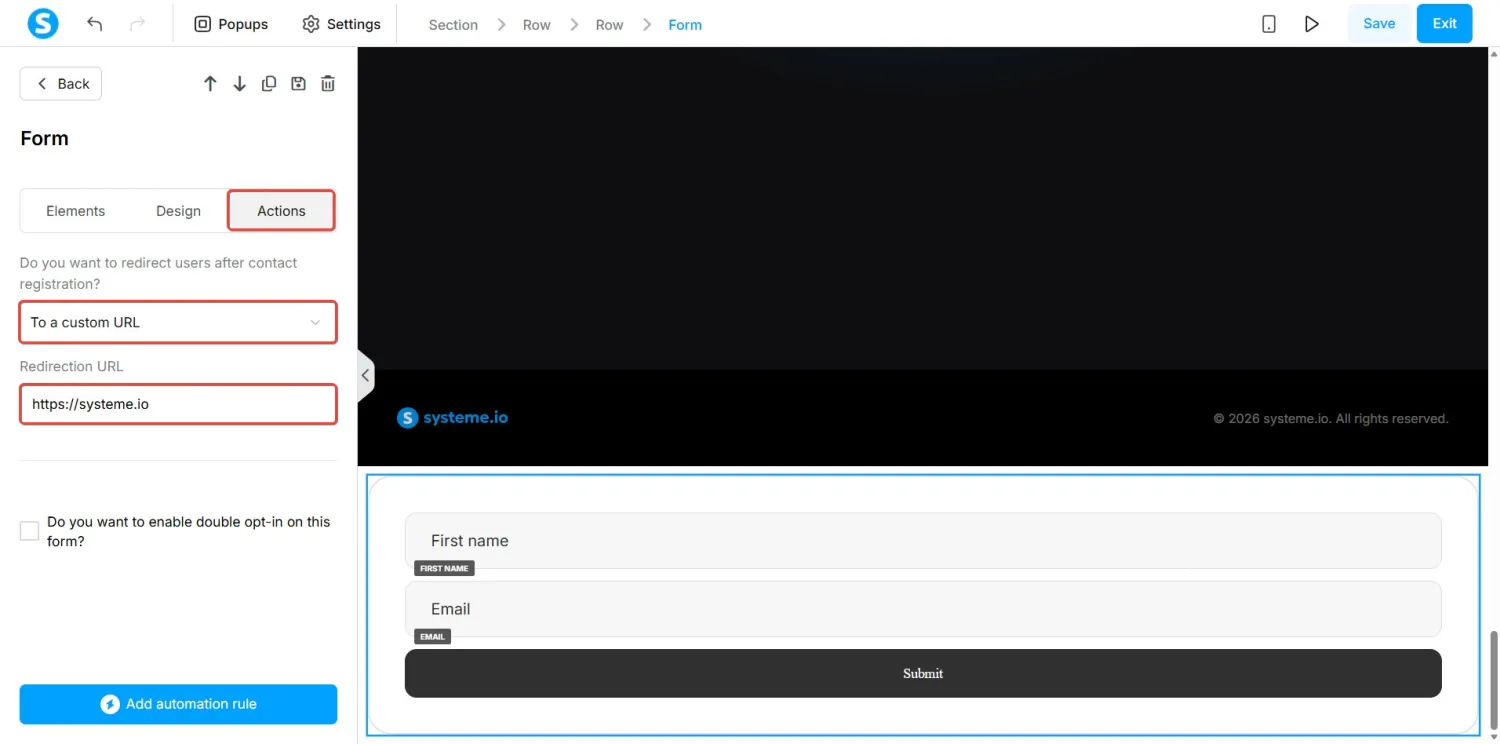
Click the Actions tab at the top of the form panel. Here you can set what happens after someone submits: redirect to a custom URL (like a thank-you page) or enable double opt-in.
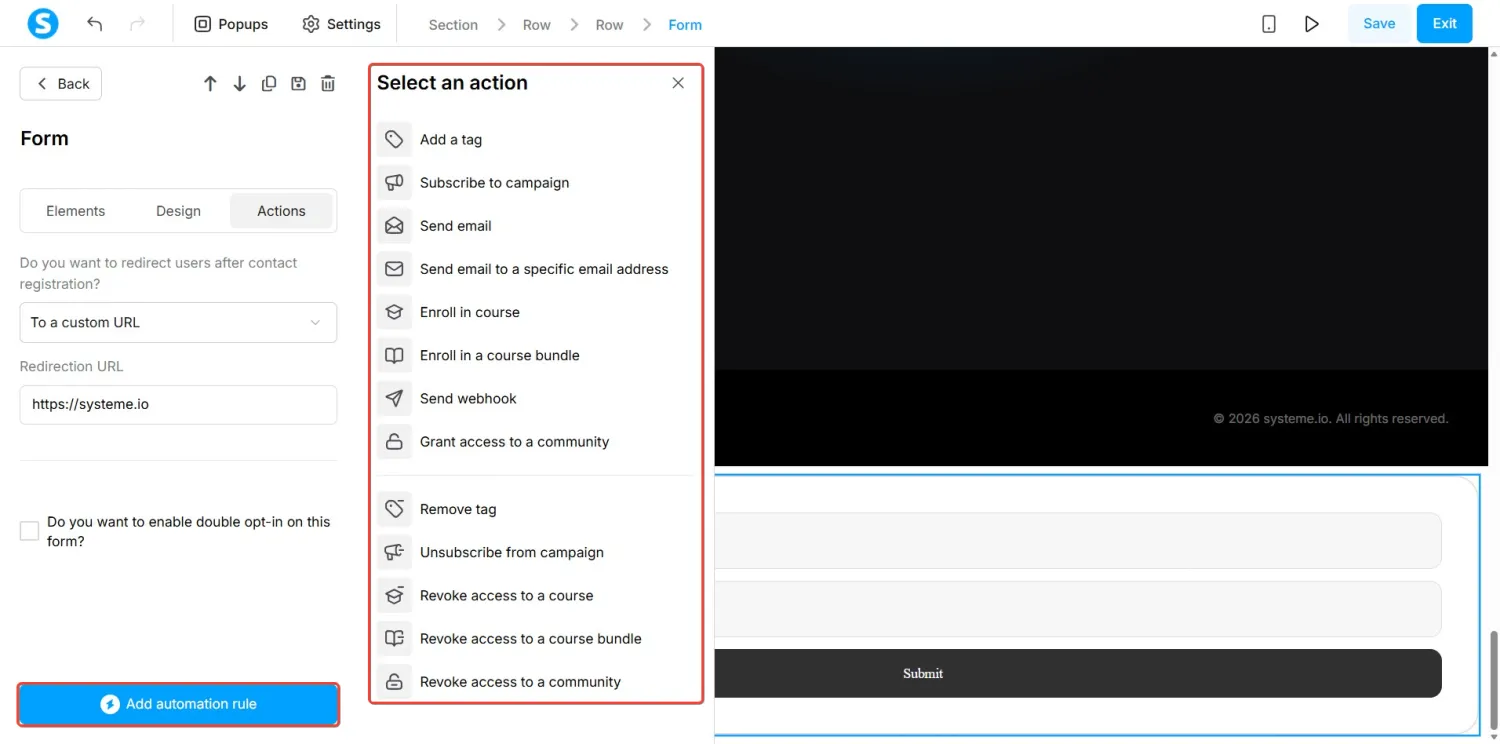
Click Add automation rule at the bottom to choose what happens when a lead comes in: add a tag, subscribe to a campaign, send an email, enroll in a course, and more.
Click Save in the top right corner
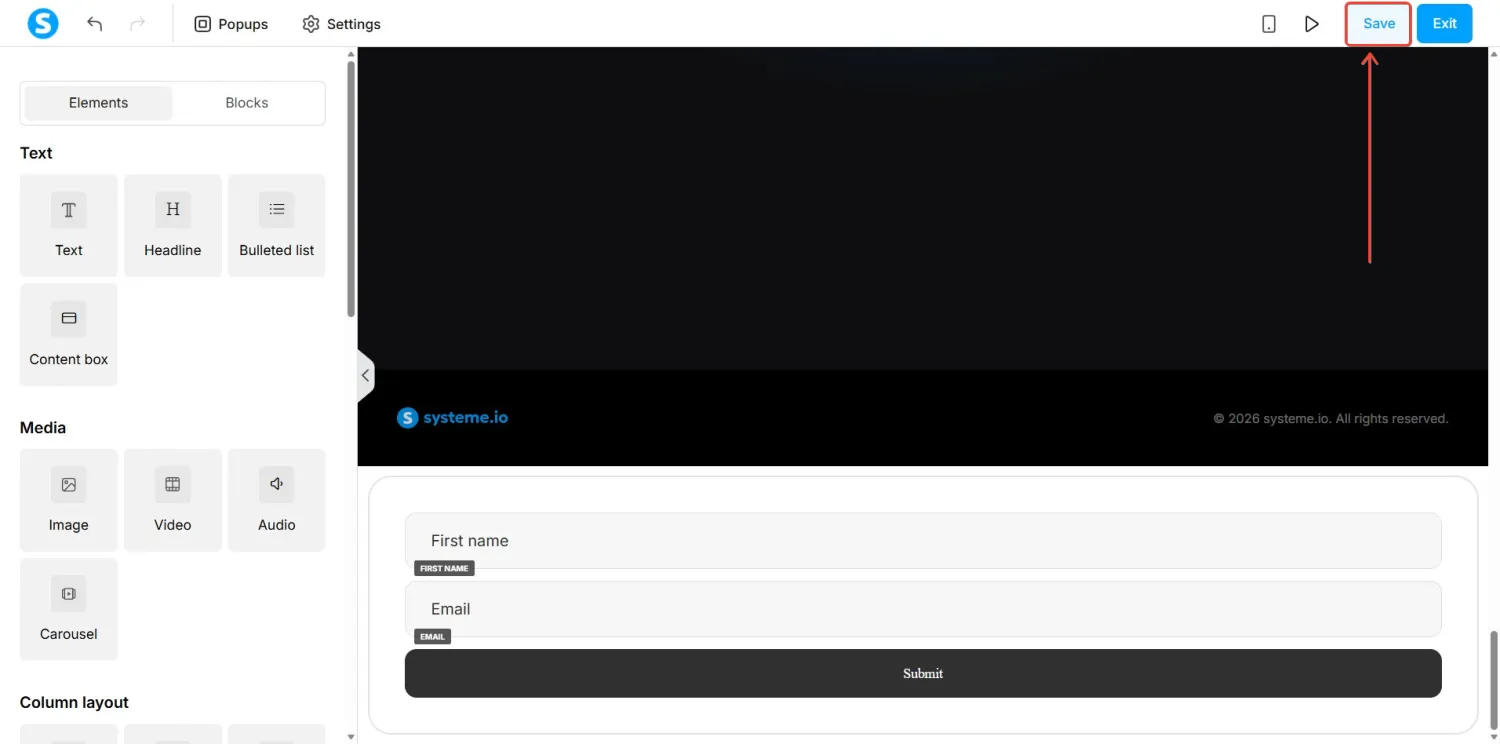
Tip: Right now, you have two separate forms on the page: your custom AI-designed form (inside the Raw HTML) and the native systeme.io form you just added. They don't talk to each other yet. The next step uses a free tool to connect them so your custom form sends data through the native one. The native form will be automatically hidden from visitors.
-
Connect the Claude form to systeme.io
This is where the magic happens. You'll use the free HTML Form Connector tool to generate a bridge script that links your custom form to systeme.io's native form.
Click on the native form element, then open the Design tab
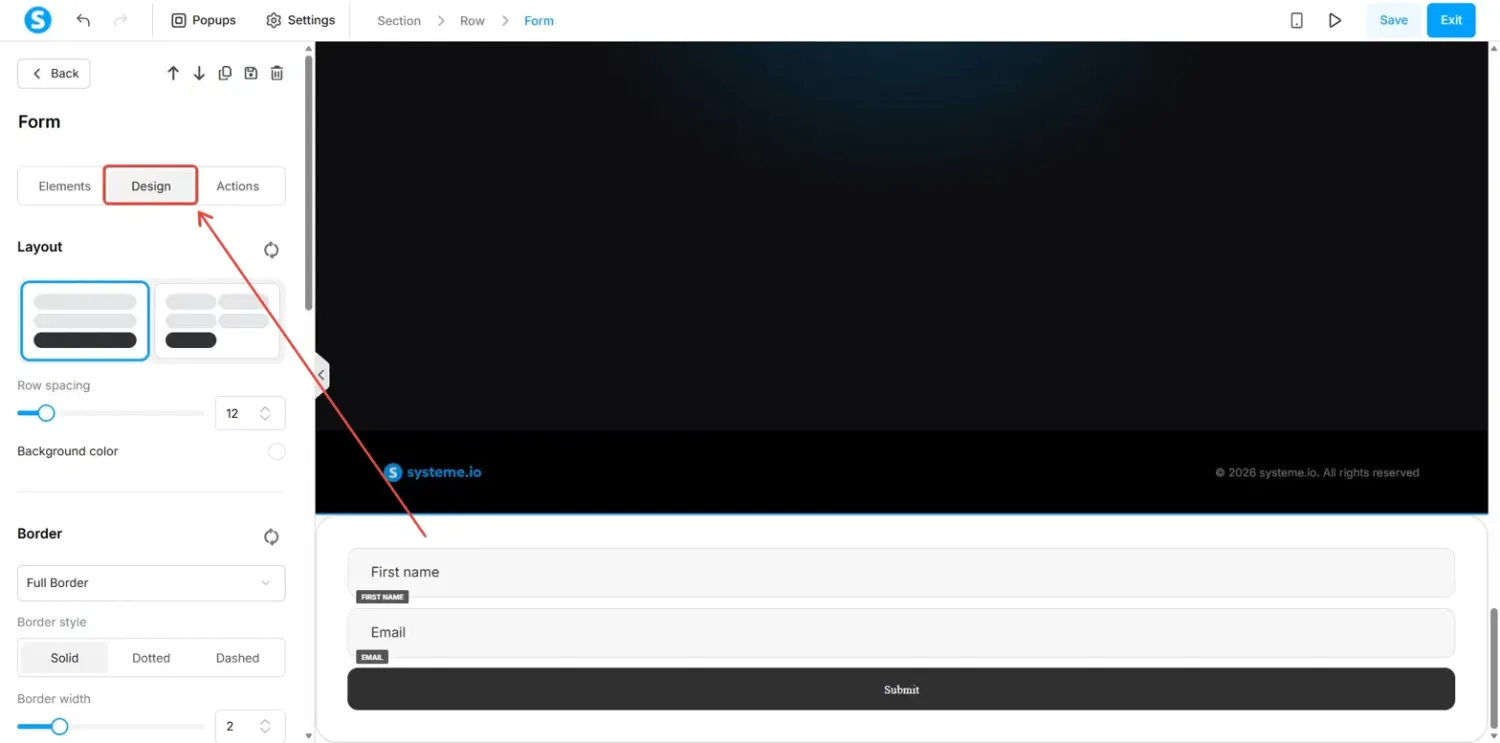
Scroll down to (Advanced) HTML attributes at the bottom. You'll see the form's ID attribute (e.g.
optinform-410da88f). Click the copy icon next to it.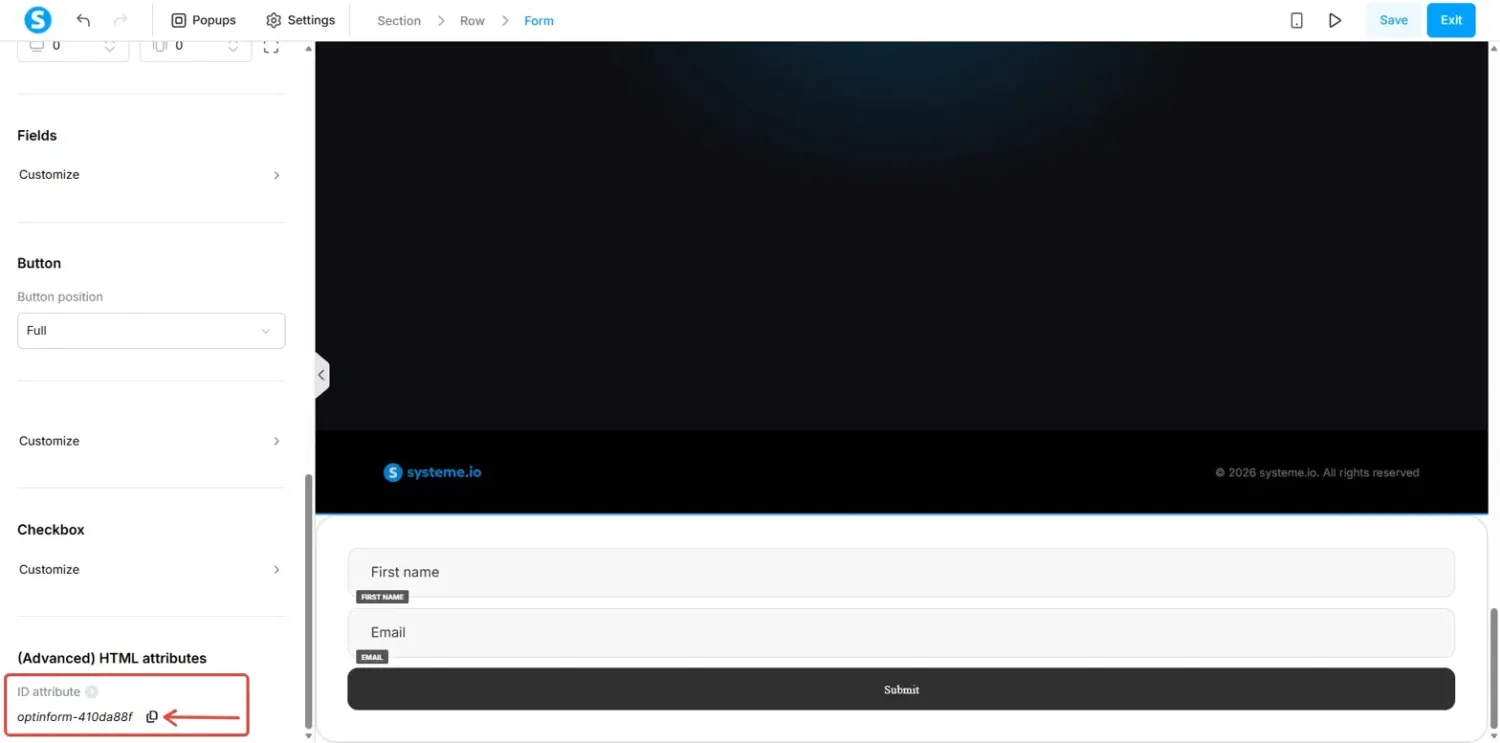
Open the HTML Form Connector tool: https://systeme.io/free-tools/html-form-connector
Paste the form ID into the Native form ID field
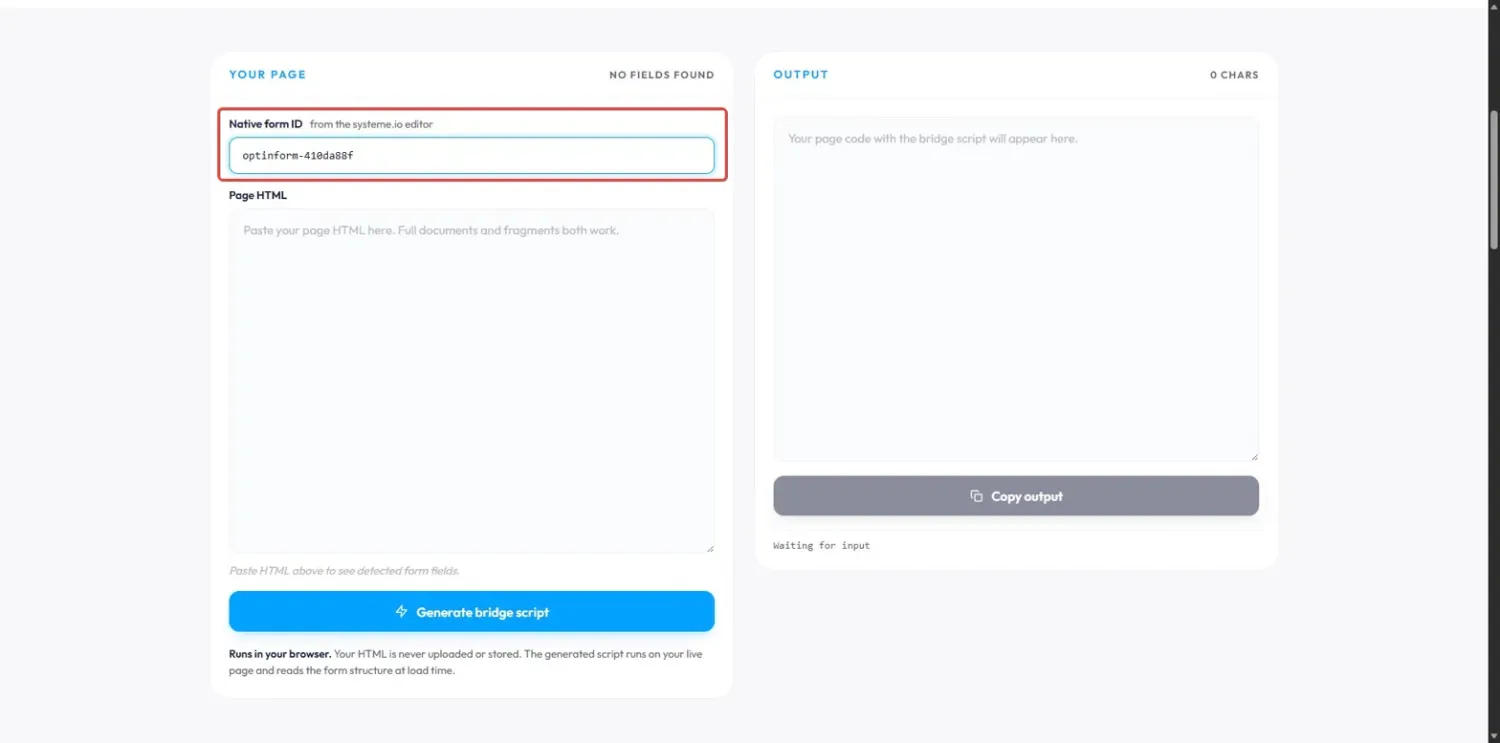
Now go back to the editor, click on the Raw HTML element, click Edit code, and select all the code (Ctrl+A / Cmd+A). Copy it.
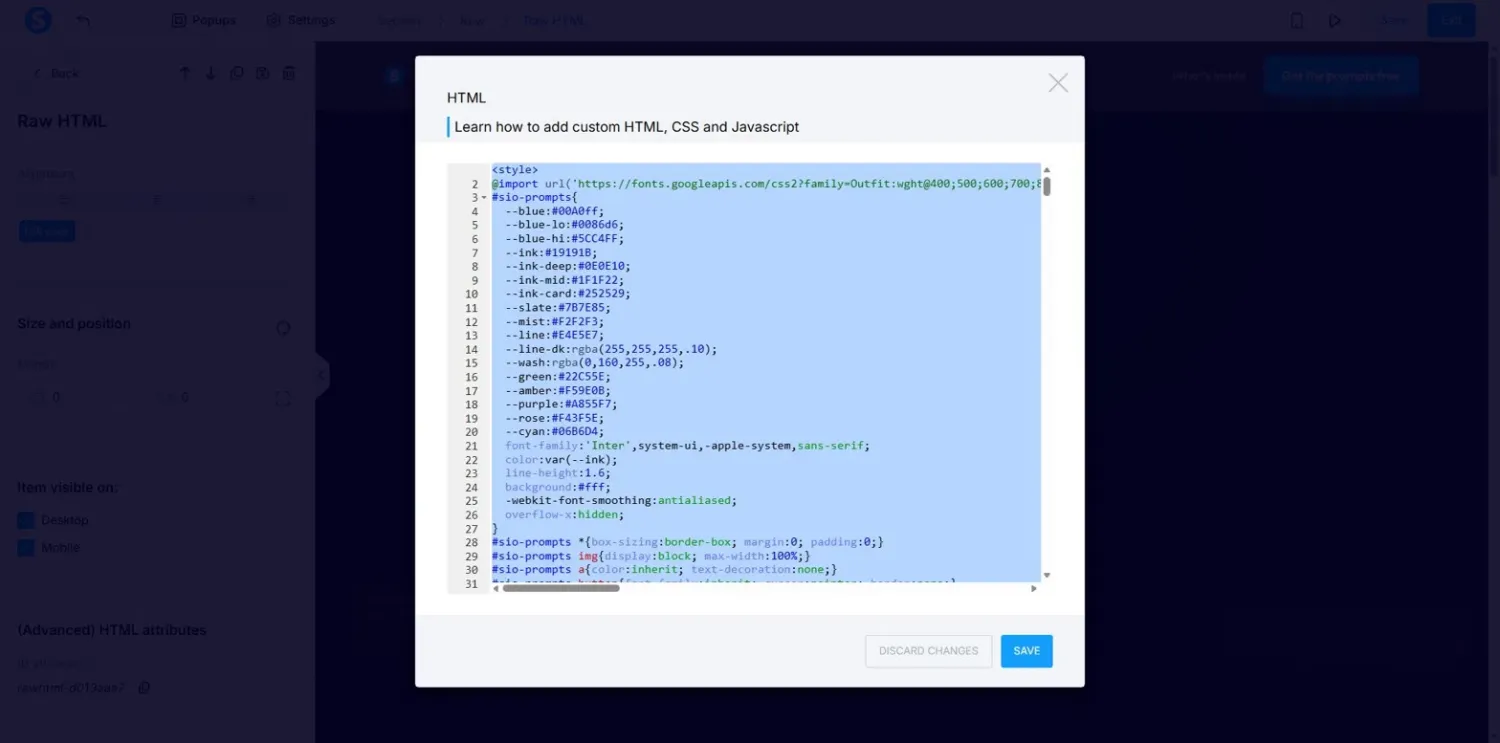
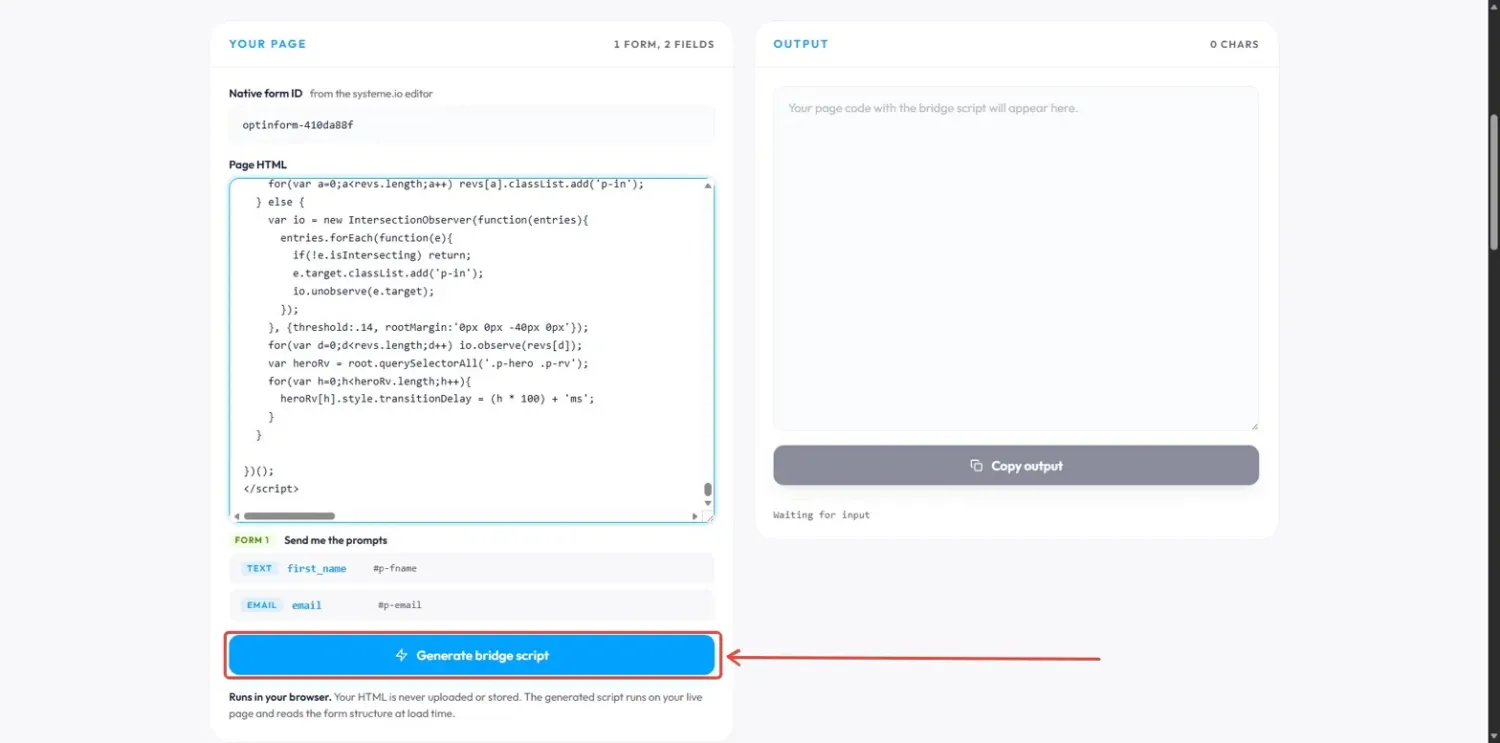
Go back to the HTML Form Connector and paste the code into the Page HTML field. The tool will detect your form fields automatically (you'll see them listed below the text area).
Click Generate bridge script
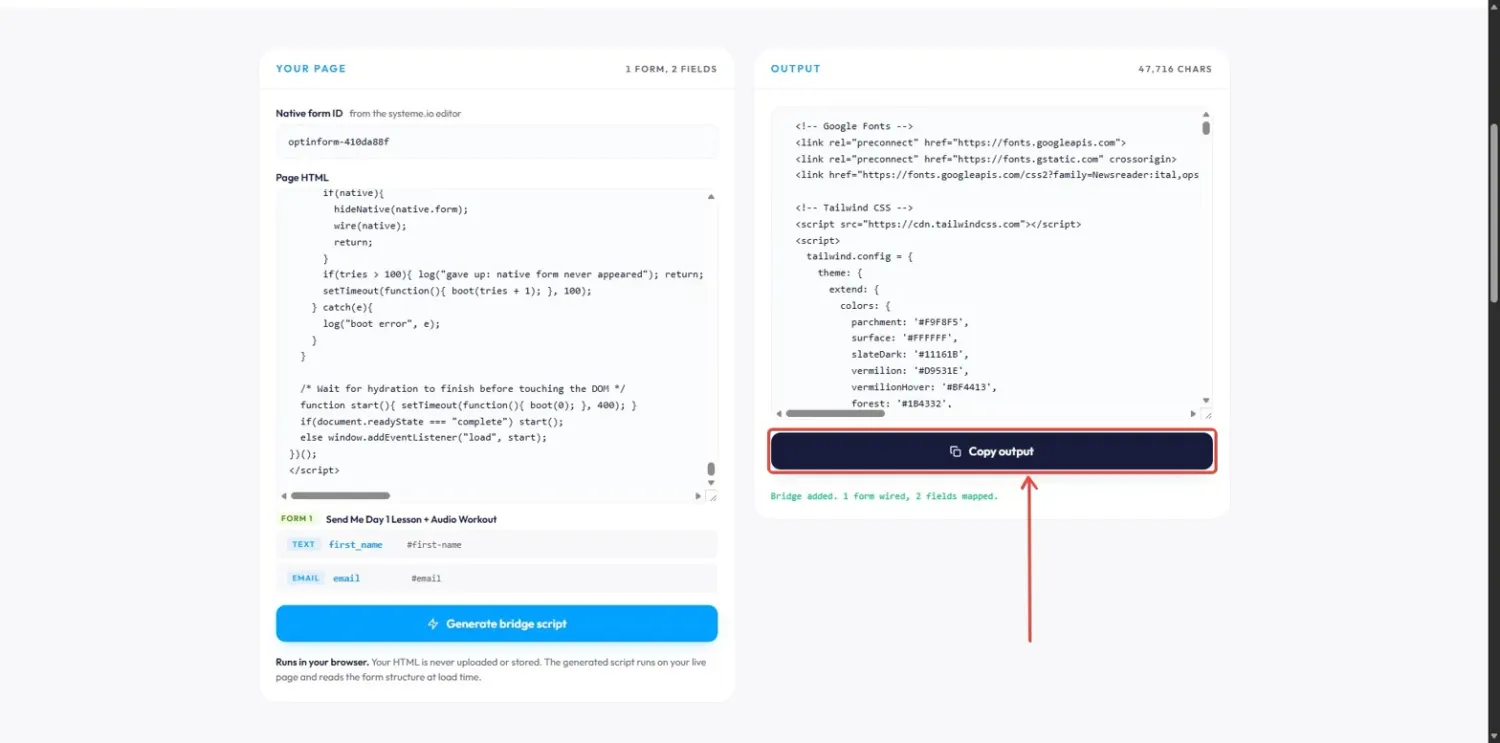
The output panel will show your page code with the bridge script added. You'll see a confirmation like "Bridge added. 1 form wired, 2 fields mapped." Click Copy output.
Go back to the editor, open the Raw HTML code editor again, select all the existing code (Ctrl+A / Cmd+A), and replace it with the output you just copied. Click Save.
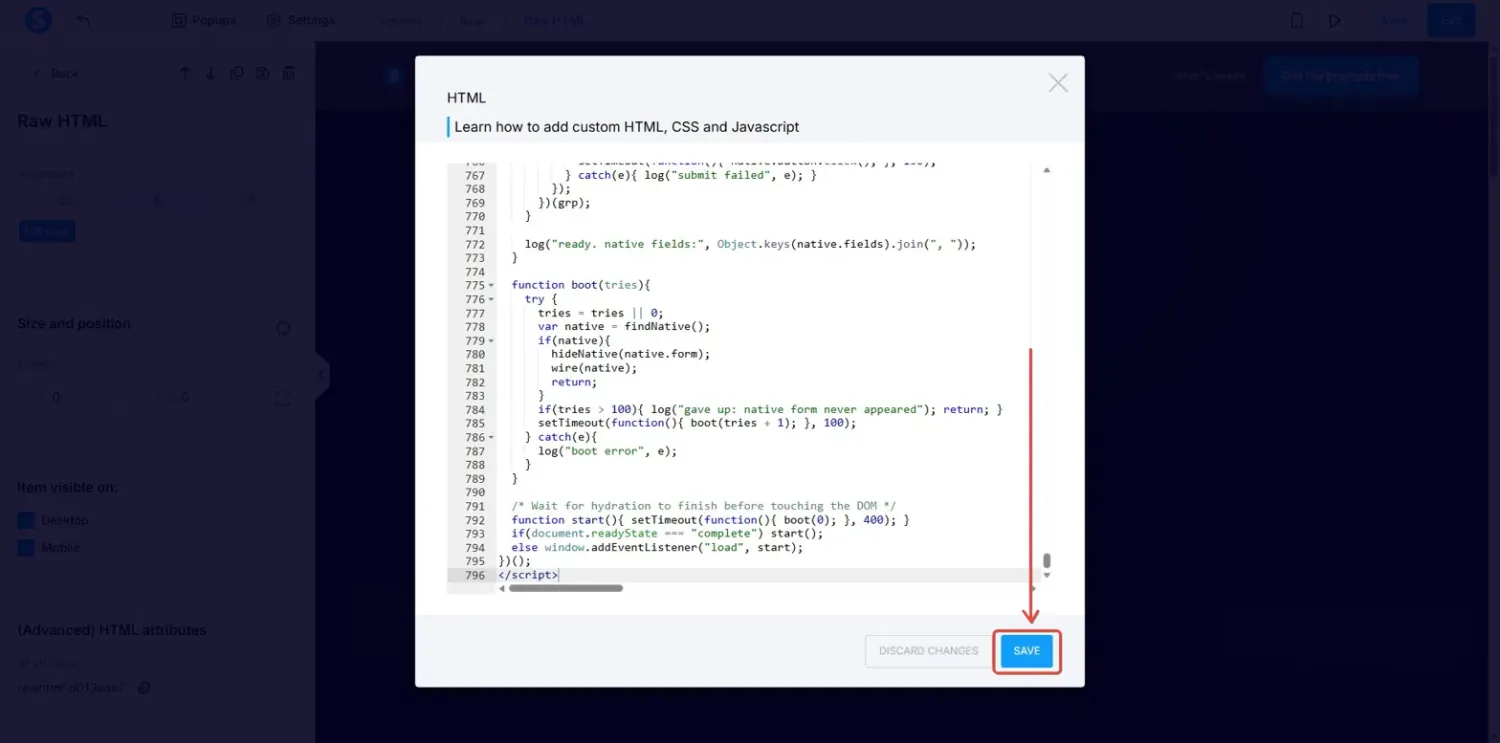
Click Save in the top right corner of the editor
The visitor sees your beautiful AI-designed form. Behind the scenes, systeme.io's native form handles the actual submission. The lead lands in your contacts, tags get applied, automations fire. Everything works as if they'd used the default form.
-
Test your landing page
Your page is already live. Every time you save in the editor, the live page updates automatically.
Go to your funnel step settings (click the step name in the left sidebar)
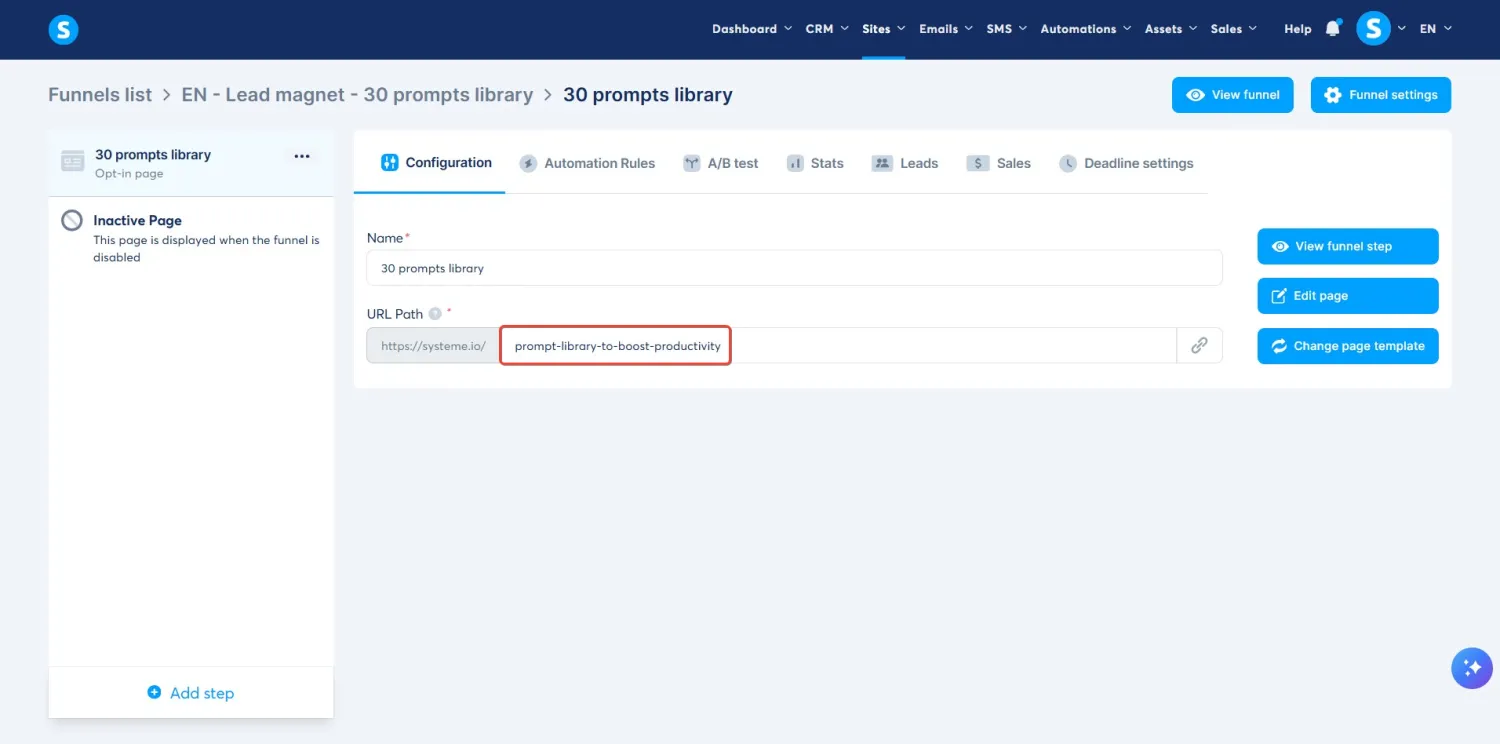
Under URL Path, you'll see an auto-generated path. You can replace it with something clean and readable
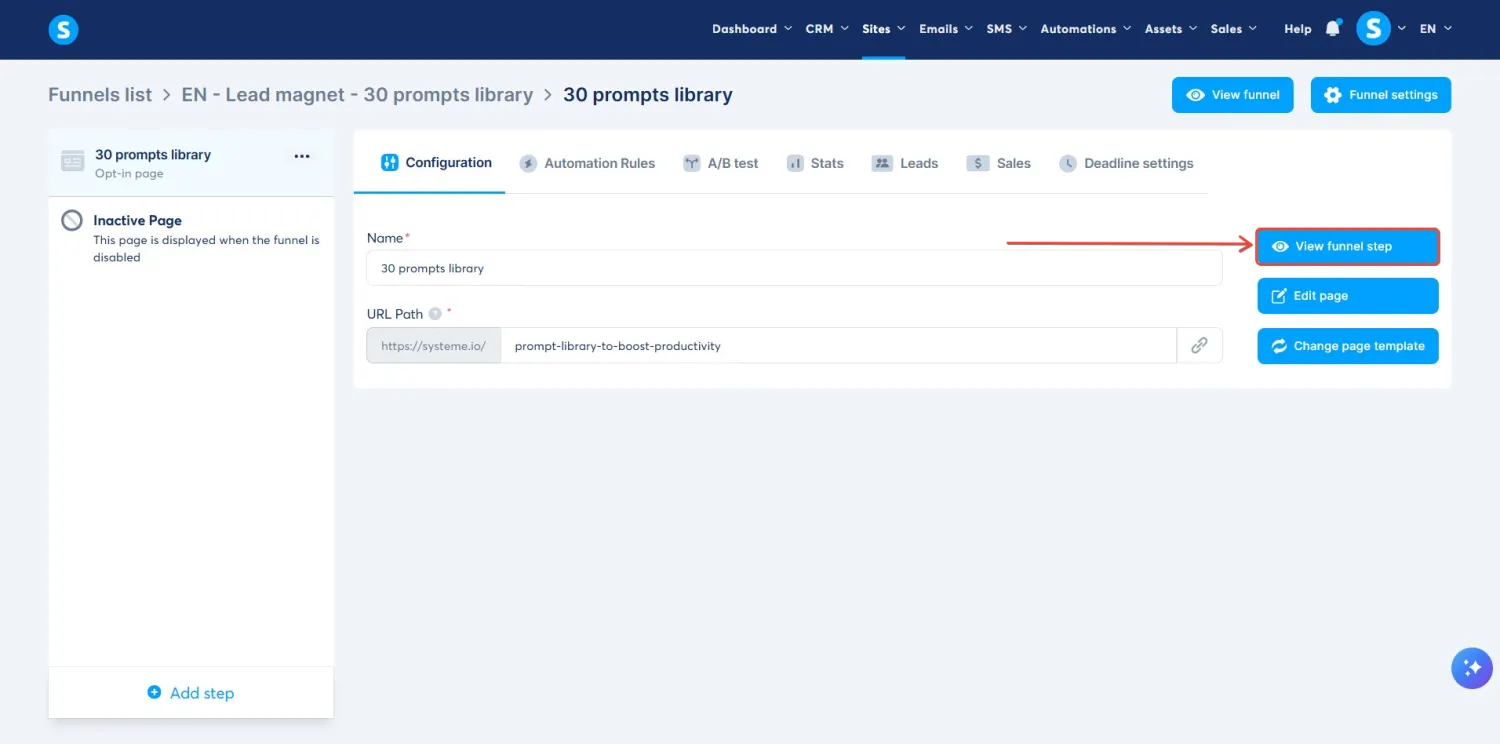
Click View funnel step to open the live page in a new tab
Submit a test email through your form
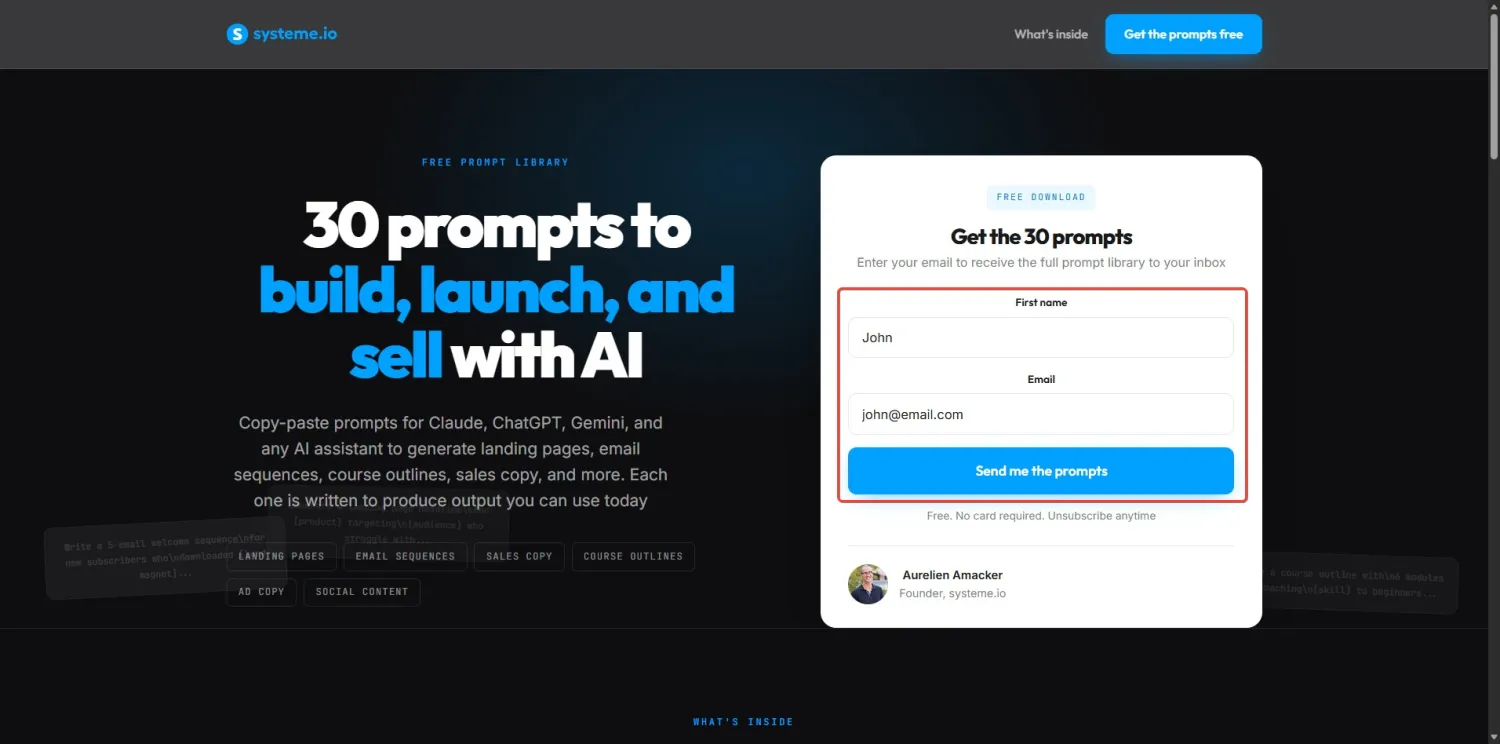
If your page has more than one form, test each one
Go to Contacts in systeme.io and confirm both test leads appeared
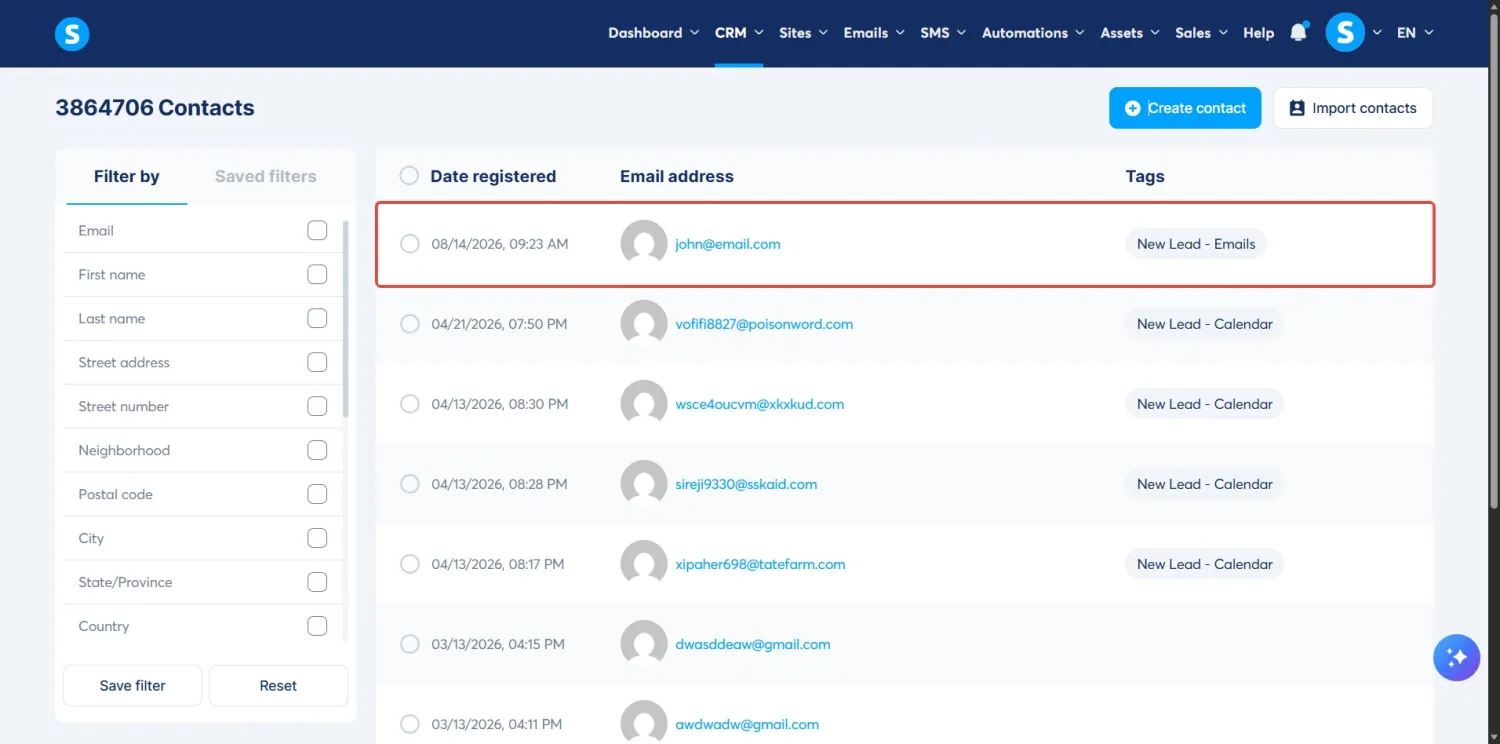
Done. You now have a professional, AI-designed opt-in page that's live, mobile-responsive, and capturing leads into a real CRM. Total cost: $0.
What's next?
Your page is live and leads are coming in. But an email in a contact list doesn't do much on its own.
The next step is to set up what happens after someone signs up. Here are some guides to keep the momentum going:
Create a thank-you page
So visitors see a confirmation after they opt in (you can build it with Claude the same way you built your opt-in page)
How to create an opt-in thank you pageSet up an automated email sequence
So new subscribers get a welcome email, your resource, and follow-up messages without you lifting a finger.
How to automate the sending of an email sequenceConnect a custom domain
So your page runs on your own URL instead of a systeme.io subdomain.
How to add a custom domainLink your funnel pages together
So visitors flow naturally from opt-in to the next step.
How to configure links between funnel pagesAll of this is included in systeme.io's free plan.
Frequently asked questions
Yes. You need a free Claude account, a free systeme.io account, and about 7 minutes. Claude writes the page, including the layout, copy, images, and form. systeme.io hosts it and handles forms, email automation, and contact management on its free plan, so the total cost is $0.
systeme.io's page editor accepts code that goes inside the <body> tag only. Claude generates a full HTML document with headers, font imports, and wrapper tags that would break if pasted directly. The free Raw HTML Converter strips the document wrapper, moves styles into the body, caps z-index values, and keeps your fonts, in about 3 seconds.
The free HTML Form Connector generates a bridge script that links your custom form to systeme.io's native form. Visitors see the AI-designed form, while the native form stays hidden and handles the actual submission. The lead lands in your contacts, tags get applied, and automations fire, exactly as if they'd used the default form.
No. You paste one prompt into Claude, and two free tools handle the technical work: the Raw HTML Converter prepares the code, and the HTML Form Connector wires up the form. Everything else happens in systeme.io's drag-and-drop editor, where you add a Raw HTML element, a native form, and click Save.
Open the live page with View funnel step, submit a test email through each form on the page, then go to Contacts in systeme.io. If the test leads appear there with the right tags, your page is capturing leads and your automations are working.


